really don’t understand how a SoC with 3GB of RAM (!) and a 8x Core ARM can be put to the bin (as Debian GNU Linux runs on devices with as little as 1GB RAM and 2x Cores) because there are no security fixes.
as it can run TuxRacer with 20FPS

imho a massive waste of resources, also imho Android is making GNU Linux more complicated than necessary. So it would have been wiser for Google to run as mainline-as-possible GNU Linux and contribute to the security of GNU Linux.
want to see what’s going on in the Open Source part of Android OS?
it is possible to build the firmware from scratch.
here is the link to xdaforums.com but there is not much activity.
works awesome 🙂

this is basically the last device where Google + Huawai worked together
the hardware specs:
- yes it is older (released 2015), but it still packs a punch and is a very well overall design and used to be best in class performance to price ratio
- modem can do: GSM / CDMA / HSPA / LTE
- Chipset Qualcomm MSM8994 Snapdragon 810 (20 nm)
- CPU Octa-core (4×1.55 GHz Cortex-A53 & 4×2.0 GHz Cortex-A57)
- GPU Adreno 430
- main cam:
- Single 12.3 MP, f/2.0, 1/2.3″, 1.55µm, Laser AF (AutoFocus)
- a lot of latest phones such as the S21Ultra also use Laser AutoFocus
- the auto focus is a bit slow and at close range (can not do makro well) sometimes has trouble finding focus (recommend alternative OpenCamera app which does a nice job showing status of auto focus)
- Features Dual-LED dual-tone flash, HDR, panorama
- Video 4K@30fps(!), 720p@240fps
- Single 12.3 MP, f/2.0, 1/2.3″, 1.55µm, Laser AF (AutoFocus)
- selfie cam:
- Single 8 MP, f/2.4
- Video 1080p@30fps
- Audio sound is actually very very good 🙂 (just as good as S12Ultra)
- 3.5mm jack Yes 24-bit/96kHz (unlike S21Ultra, imho Audio Jack is A MUST!)
- has front stereo speakers
- WLAN Wi-Fi 802.11 a/b/g/n/ac, dual-band, Wi-Fi Direct, DLNA, hotspot
- Bluetooth 4.2, A2DP, LE
- GPS Yes, with A-GPS, GLONASS (Russia)
- Sensors Fingerprint (rear-mounted, never used it), accelerometer, gyro, proximity, compass, barometer
- Type Li-Po 3450 mAh, non-removable
- Models H1511, H1512
- SAR: (could be better)
- SAR 1.49 W/kg (head) 0.81 W/kg (body)
- SAR EU 1.17 W/kg (head) 0.54 W/kg (body)
what is missing imho: MicroSD card slot
officially the latest Android for this device is: 8.1.0 (Android Security Updates 5. Dezember 2018)
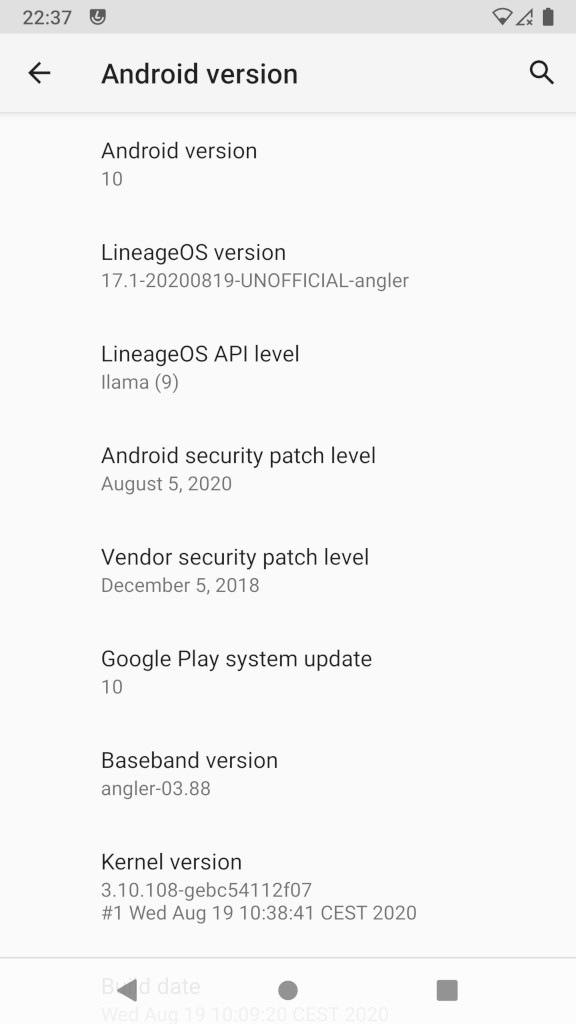
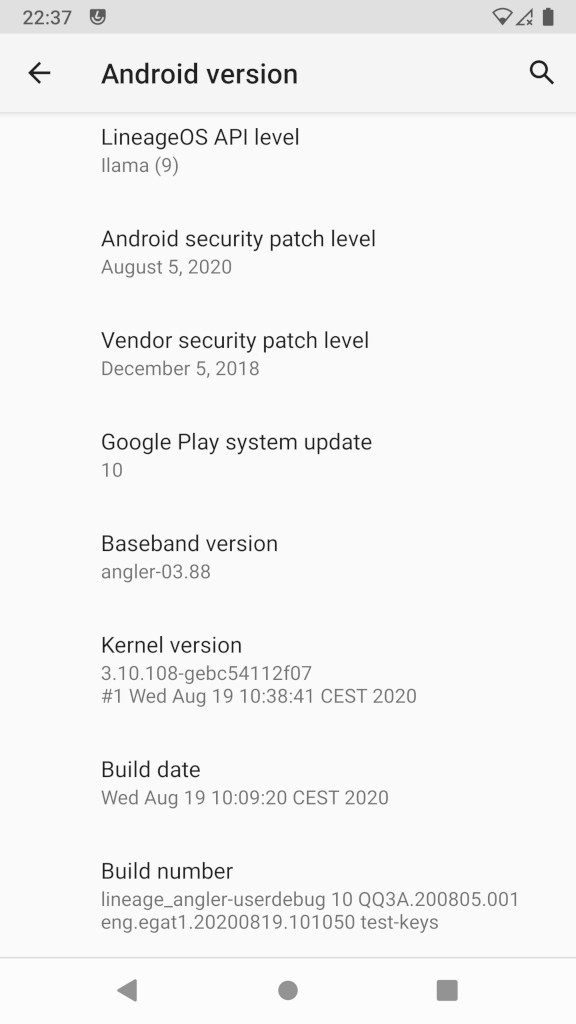
but there is UNOFFICIAL Android 10 🙂 (tested! but currently… not able to root with magisk… so no AFWall+)
![]()
nice video tutoral (windows based)
what about root?
“Since Google and different OEMs are changing things a lot starting from Android Pie, there are popping up more and more limitations for installing and running Magisk” (src: didgeridoohan.com)
“But why is LineageOS dropping addonsu in the first place? That is because PrivacyGuard, a LineageOS feature that addonsu leveraged, is also being removed in LineageOS 17. PrivacyGuard offered users advanced permission management controls over what was possible on stock Android. The LineageOS team was unable to port the PrivacyGuard framework to the new Android 10 base, and instead, the team is utilizing Google’s own Permissions Hub feature in Android 10. This Permissions Hub feature is the same permission controls that we saw in our early leaked Android Q builds, but one that was absent in public releases. Google did not release the feature in Android 10, but the code for it still exists in AOSP. LineageOS has forked it and will offer it as the alternative to PrivacyGuard.” (src)
requirements:
- patience & concentration
- a high quality USB C cable https://www.pollin.de/p/usb2-0-kabel-roline-gold-usb-a-auf-usb-c-0-8m-713536
- 100% charged Nexus 6P 🙂
update: how to root with Magisk v20.4 and install a AFWall+ firewall:
hostnamectrl; # tested on:
Operating System: Debian GNU/Linux 10 (buster)
Kernel: Linux 4.19.0-18-amd64
Architecture: x86-64
- get twrp-3.3.1.0-FBE-10+-angler.img
- sha512sum: c0f4850a2caf8109dac5f26c040fc8ee3470f3bcba8cc02c31c65df2902ae89103c818fdfabee317c8652eceddc74dbdbb99aa53534e81df88630db18747004c
- get Magisk-v20.4.zip
- direct link
- sha512sum: 9136ae006aeae21a6d790f0fb9e135af52200d4cd3117d15119780f158627599411231ce4ff652b1d9a527d05c827b0f6287de98da30be96380537439a74a14f
- get lineage-17.1-20200819-UNOFFICIAL-angler.zip
- sha512sum: 9372d4f286072fbe3b403efcd483928c247cefbaf0282cfb55a782d40f43e89a5c169811439c7bf5867e16333f0fc48f180188891d587825d5b6233c0404a6df
- boot to twrp recovery (power off phone, hold power+volume-down for 5sec
- flash twrp:
-
su - root
adb devices; # adb needs to be installed
fastboot flashing unlock
fastboot devices
ENUSERIALOFDEVICE fastboot
fastboot flash recovery twrp-3.3.1.0-FBE-10+-angler.img
-
- with volume up / down select “recovery” mode, hit power button for enter / confirm
- via usb cable upload files: lineage-17.1-20200819-UNOFFICIAL-angler.zip and Magisk-v20.4.zip to device
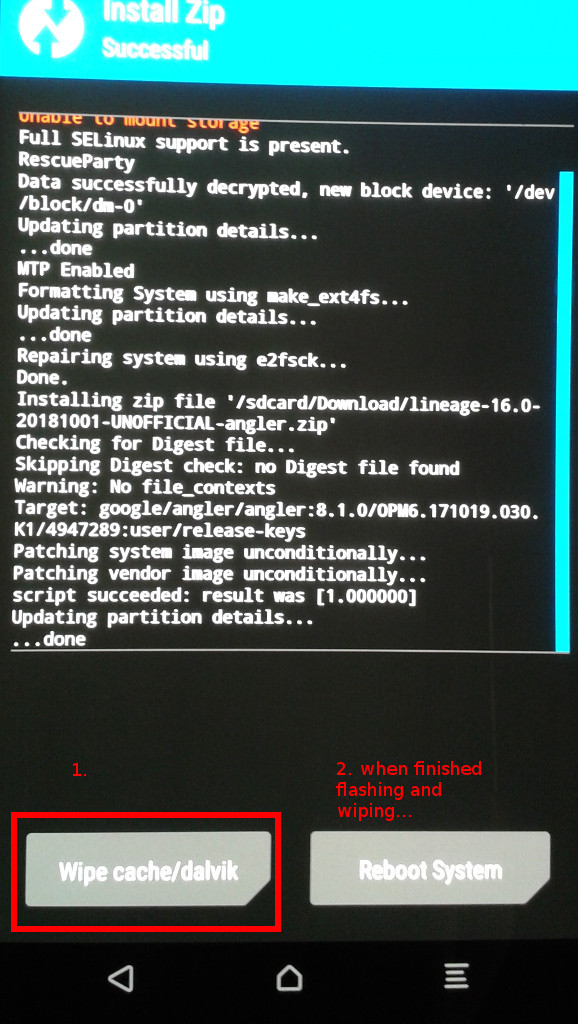
- via twrp: select: install rom zip lineage-17.1-20200819-UNOFFICIAL-angler.zip
- confirm to Wipe Dalvik/Cache
- via twrp: select: install rom zip Magisk-v20.4.zip
- go to wipe: Format Data Partition (“yes”)
- reboot and choce NOT to install twrp App
- if it worked: CONGRATZ! 🙂

- now boot into newly system
start AFWall+ it should ask:

but might fail:
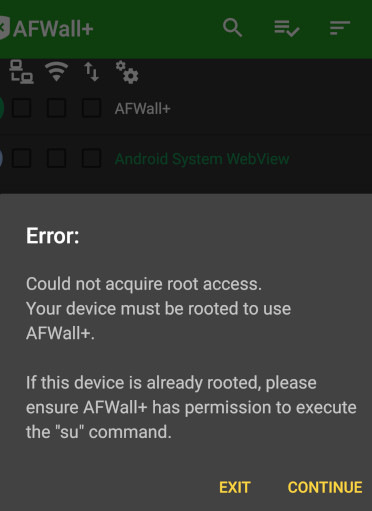
it might be needed to go into settings of Magisk and explicitly select AFWall+ to grant root rights:

longer story:
use this guide https://lineageosroms.com/angler/
along with this guide
LineageOS 17.1 (UNOFFICIAL)


LineageOS 15.1 (OFFICIAL)
“Pretty much everything you do on the phone is data-mined by Google. The mic is on listening most of the time (waiting for OK Google), it’s always monitoring WiFi and/or GPS, email and text get indexed, all your images get sent to the cloud (if you opt-in), etc. This is very standard for Google. Google uses this data for advertising (this allows them to offer you these services for ‘free’) and to make its services more convenient for the user (easily search emails, Google Maps knows what traffic is like, etc.). For many, it’s an unacceptable invasion of privacy.” (src: reddit.com)
Some relevant links, for people who missed the continuation of the projects:
- Releases: https://grapheneos.org/releases
- Install documentation: https://grapheneos.org/install
- Build documentation: https://grapheneos.org/build
- Sources: https://github.com/GrapheneOS
- Information on the Auditor app and AttestationServer: https://attestation.app/about
- Next generation hardened malloc implementation: https://github.com/GrapheneOS/hardened_malloc
- Archive of some old repositories with features that still need to be ported over: https://github.com/AndroidHardeningArchive
- Announcement of rename from AndroidHardening to GrapheneOS: https://www.reddit.com/r/CopperheadOS/comments/b6muvh/androidhardening_project_renamed_to_grapheneos/
the cool thing, you can do this completely from gnu-linux now 🙂
the user will need to download those files:
- bootloader-angler-angler-03.84.img
- here is the backup: bootloader-angler-angler-03.84.img.tar.gz
- 686c69e9d4a9ddbc5cf53a89a84abe9be62c883b22bf1bf83a613d3e2ba95b19a71b1fbb3ffd37b180a7a2a63f3d26a145db26ca6e583d94bcf4497537d5ba1d bootloader-angler-angler-03.84.img
- platform-tools_r28.0.1-linux.zip
- the genious alternative boot loader: TWRP (take latest version)
- 2021-11 latest was: https://dl.twrp.me/angler/twrp-3.5.2_9-0-angler.img.html
- 315fcd96a2d37b799781d323f574c8f238e3806585fb2fa74a8bab1a13c98a7f twrp-3.5.2_9-0-angler.img
- older Version confirmed to work too: twrp-3.2.3-0-angler.img
- 115ead764a896f559459e6fa2e230f35bbef1066f25d4354e3728309317917081318c32549c3b10c584720e911338f077d6716f711506bf7407b082f0c64d28c twrp-3.2.3-0-angler.img
- lineage-15.1-20190224-nightly-angler-signed.zip
- 34164f38b13325a6c20c193f806c71a66e57c45c82db9bbbe1e2f6a8370e1d6a1db61cfe55c8691f7c0cd35abfc458d81ea62480fe2bbf292673c7de6c74d9b7 lineage-15.1-20190224-nightly-angler-signed.zip
- radio-angler-angler-03.88.img
- here is the backup: radio-angler-angler-03.88.img.tar.gz
- 59953ebbdf694358ddc1ae43cd372d4b94bc478db26c0b4db28ad020c8d5ddb88c6fa5ee9cc35608ad2735307f7509ee66aef5b6dd8841a3b709cdfa8222967d radio-angler-angler-03.88.img
- vendor-angler-opm7.181205.001.img
- here is the backup: vendor-angler-opm7.181205.001.img.tar.gz
- 68295f1dc236fc30a2b8fed3db08d460b148fff517d72b3c6b05f6b95f5f7aae86f15986b4df4ff818dfe493fb8cb1f682122ed4e39b8f3d8b150c75da1907d0 vendor-angler-opm7.181205.001.img
(it is said you can extract the very latest radio vendor bootloader img from official google zip here)
before you proceed: backups! backups! backups!
if this is not a “virgin” device, you shall backup all your:
- pictures (simply attach an Anker USB-C to your PC / Laptop, enable File-Transfer-Mode at the Mobile and copy and paste)
- contacts (how to export more than 500 contacts at a time to file.vcf)
- AND APPS!
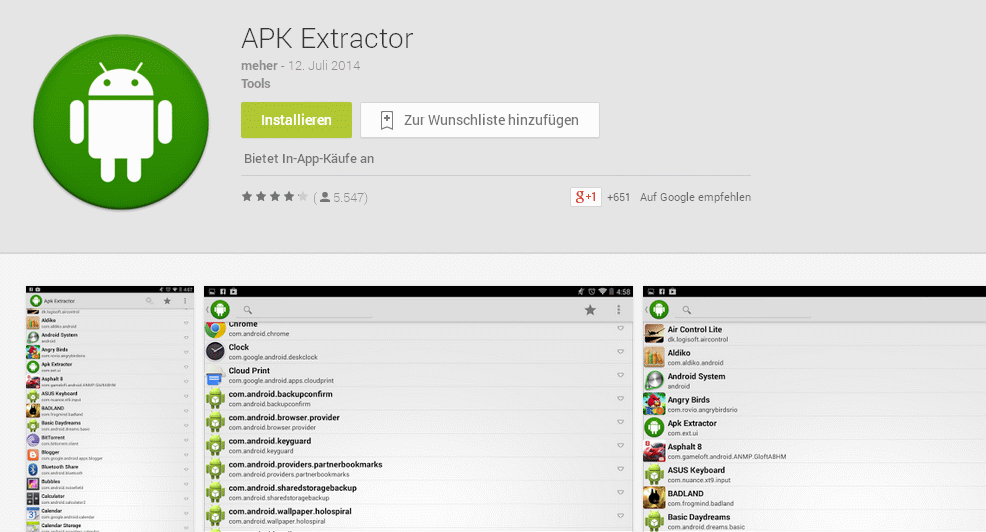
- YES YOU CAN EXPORT/BACKUP YOUR APPS into App.apk WITH the very cool App:
- AppExtractor.apk
- sha256sum 704657cce87448ef0b8fb853c49886a5353c6349ab5720bc86dd541b6900b9f1
- sha512sum fcc8988088ec852ef8e57d094428b0299f0484cb23fde0efed12289a50882c9a469d3d8720a7feea7637e8654cdd1a83f5891d0a773c11d3ca51ceadf556ca8e
(and backup them to your PC/Laptop)
not exactly sure if this is the same app: https://f-droid.org/en/packages/axp.tool.apkextractor/
how to:
on the nexus 6p device:
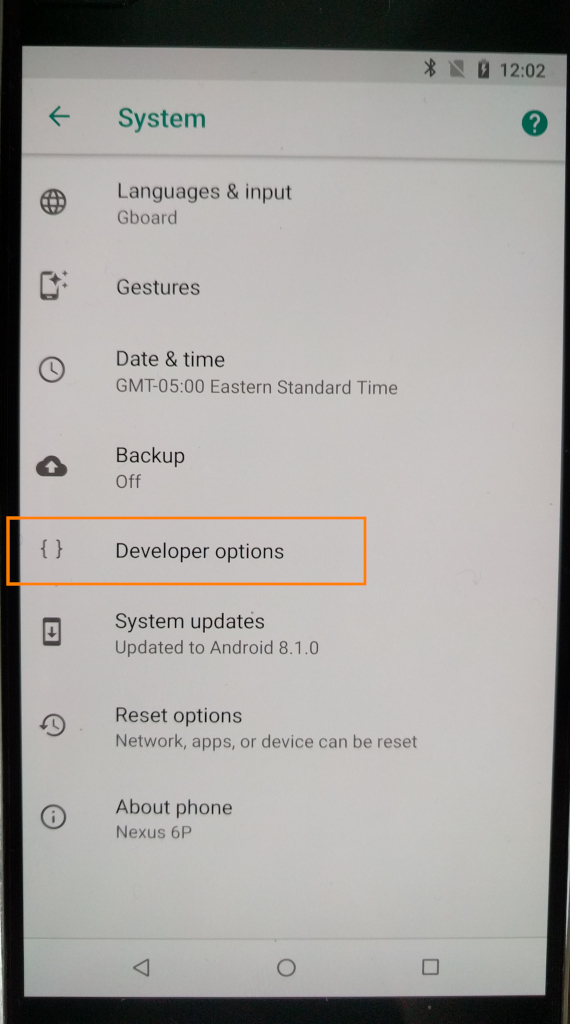
Enable OEM unlock in the Developer options under device Settings, if present.
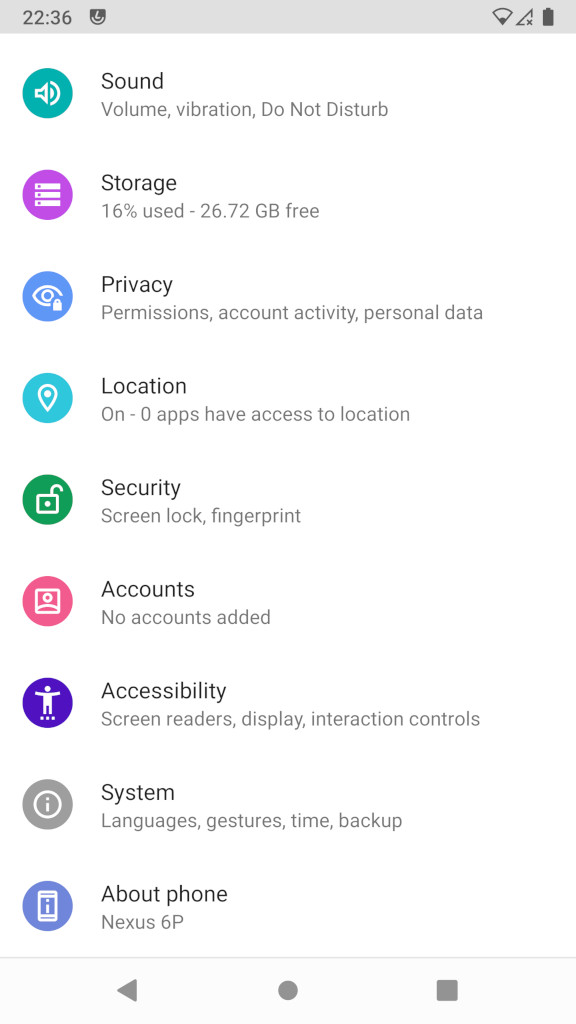
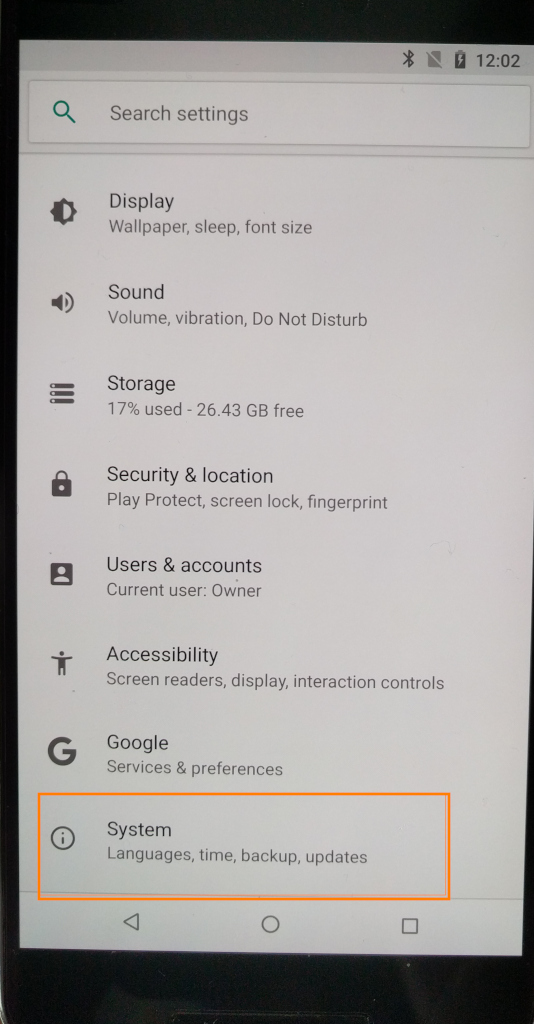
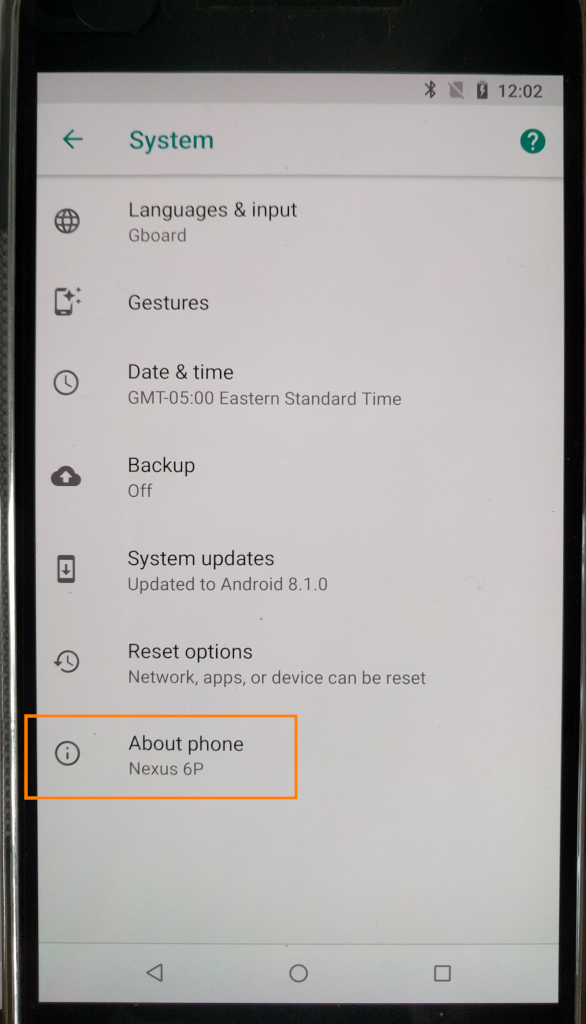
- go to settings
- go to “about the phone”
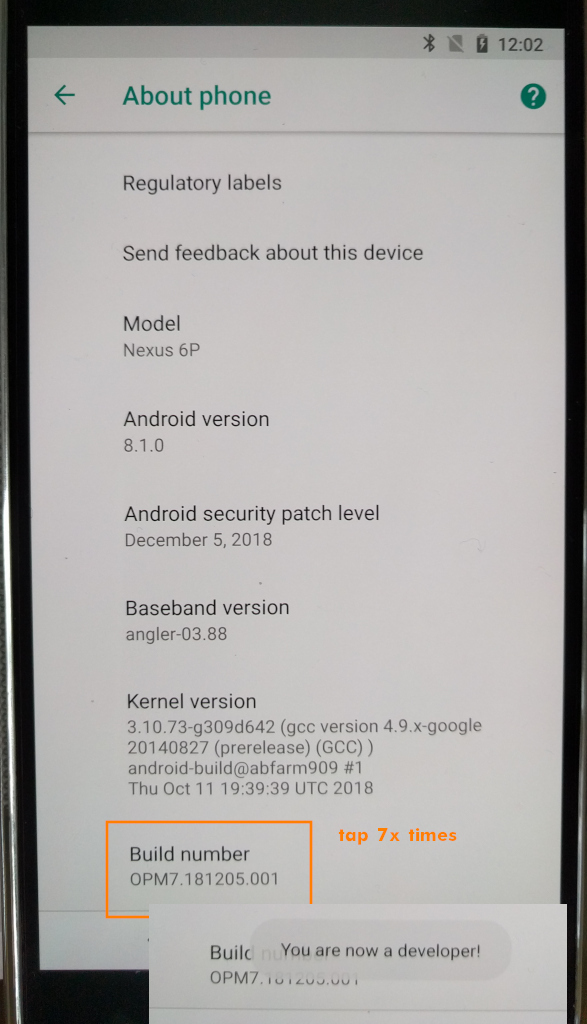
- tab the “Build-Number” option several times to enable developer options
on the PC
# tested in 2021-11 again with/on hostnamectl Operating System: Debian GNU/Linux 10 (buster) Kernel: Linux 4.19.0-18-amd64 Architecture: x86-64 # you need to work as root su - root; # become root apt update apt install adb fastboot; # install adb and fastboot adb --version Android Debug Bridge version 1.0.39 Version 1:8.1.0+r23-5 Installed as /usr/lib/android-sdk/platform-tools/adb apt show adb # Homepage: https://android.googlesource.com/platform/system/core Description: Android Debug Bridge A versatile command line tool that lets you communicate with an emulator instance or connected Android-powered device. This package recommends "android-sdk-platform-tools-common" which contains the udev rules for Android devices. Without this package, adb and fastboot need to be running with root permission. # so it is not needed anymore to "install" this manually? unzip platform-tools_r28.0.1-linux.zip mkdir $HOME/adb-fastboot mv -v platform-tools $HOME/adb-fastboot/ export PATH="$HOME/adb-fastboot/platform-tools:$PATH" # test adb --version Android Debug Bridge version 1.0.40 Version 4986621 Installed as /root/adb-fastboot/platform-tools/adb # connect to wifi and apply all vendor updates # avoid this hazzle of: (you can skip those steps later!) # fastboot flash radio radio-angler-angler-03.88.img # fastboot flash vendor vendor-angler-opm7.181205.001.img # fastboot flash bootloader bootloader-angler-angler-03.84.img # tap the build number 7x times to unlock developer mode # enable USB debugging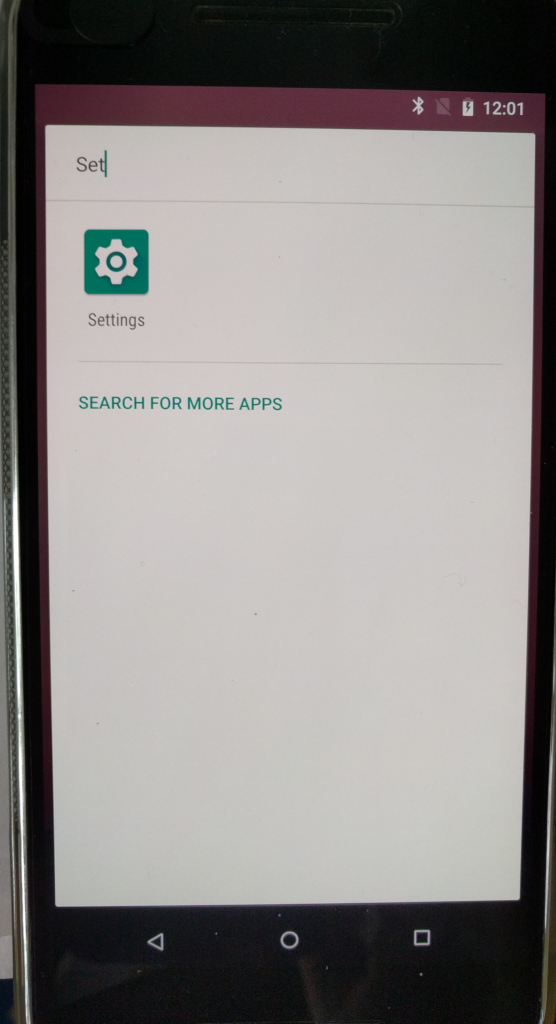
# reconnect with USB to PC # it should ask for "do you want to allow usb debugging from mac" # check the box (permanent)
# preparations: put a screen lock pin # this pin will be used to encrypt your harddisk, which android now does per default # step is necessary because alternative bootloader TWRP will not be able to access or write to encrypted partitions # connect device via usb cable to pc (would use a high quality cable and a usb 2.0 port) # upload rom to device under this folder: /sdcard/lineage-15.1-20190224-nightly-angler-signed.zip # restart pc # restart nexus 6p adb reboot bootloader # nexus 6p should reboot and show bootloader # show connected device fastboot devices ENUSERIALOFDEVICE fastboot # manual/old way: # power off device # now hold down power and volume+down # you should now see the bootloader adb start-server adb devices List of devices attached ENUSERIALOFDEVICE device adb reboot bootloader fastboot devices ENUSERIALOFDEVICE fastboot fastboot flashing unlock # if it says... FAILED (remote: oem unlock is not allowed) finished. total time: 0.020s # reboot the device # to to settings # go to developer options # enable "allow unlocking boot loader" something option... fastboot flashing unlock (bootloader) Device already unlocked! FAILED (remote: '') Finished. Total time: 0.017s fastboot devices # go where you downloaded the files cd /run/media/root/SOFTWARE/ANDROID/NEXUS_P6/ # crc check sha256sum -c twrp-3.5.2_9-0-angler.img.sha256 twrp-3.2.3-0-angler.img: OK # flash alternative bootloader to device fastboot flash recovery twrp-3.5.2_9-0-angler.img target reported max download size of 494927872 bytes sending 'recovery' (18392 KB)... OKAY [ 0.519s] writing 'recovery'... OKAY [ 0.269s] finished. total time: 0.789s # older version tested previously fastboot flash recovery twrp-3.2.3-0-angler.img Sending 'recovery' (16816 KB) OKAY [ 0.469s] Writing 'recovery' OKAY [ 0.245s] Finished. Total time: 0.741s

# of course will swipe this :)
# congrats! # now the phone should (again) still act like usb stick # so it is possible to upload LineageOS # and flash it via twrp fastboot reboot-bootloader adb devices List of devices attached ENUSERIALOFDEVICE recovery # this way you can upload rom.zips even when the device is not fully booted adb push lineage-15.1-20190224-nightly-angler-signed.zip /sdcard/lineage-15.1-20190224-nightly-angler-signed.zip lineage-15.1-20190224-nightly-angler-signed.zip: 1 file pushed. 8.8 MB/s (445945632 bytes in 48.171s) # YOU SHOULD NOT NEED THIS STEP # IF YOU UPDATED YOUR DEVICE TO LATEST STOCK FIRMWARE! fastboot flash radio radio-angler-angler-03.88.img Sending 'radio' (48728 KB) OKAY [ 1.823s] Writing 'radio' OKAY [ 2.163s] Finished. Total time: 4.010s fastboot reboot-bootloader rebooting into bootloader OKAY [ 0.010s] Finished. Total time: 0.060s fastboot flash vendor vendor-angler-opm7.181205.001.img Sending 'vendor' (192577 KB) OKAY [ 5.728s] Writing 'vendor' OKAY [ 3.378s] Finished. Total time: 9.132s fastboot reboot-bootloader rebooting into bootloader OKAY [ 0.013s] Finished. Total time: 0.063s fastboot flash bootloader bootloader-angler-angler-03.84.img Sending 'bootloader' (3554 KB) OKAY [ 0.568s] Writing 'bootloader' OKAY [ 0.206s] Finished. Total time: 0.802s # now select recovery and press power button to select # you should see the TWRP alt boot loader asking your for pin to unlock encrypted partition # go to wipe -> advanced -> wipe system partition
# go to install -> select rom you uploaded to device # hit install :)
# wipe dalvik cache and cache # reboot and lineageOS should ask you for your pin

screenshots are done like this: push and hold both the power button and the volume down key at the same time. Push both at exactly the same time, hold for a moment, and let go
fix No Sim Card Detected:
This has been happening on many custom ROMs.
An easy fix is to go to security settings and change screen lock to swipe or none, then reboot.
That will remove the device protection that caused the no sim problem.
After the reboot, the problem is fixed and won’t happen anymore.
Then you can go back into security settings and change it back to whatever screen lock option you want.
how do i install Apps on my device if without using Google’s PlayStore?
you can use the vey cool indeed “Open Source Only” App-Store
https://f-droid.org/FDroid.apk
or simply copy back your AppExtractor.apk exported Apps to your Nexus and install them.
how to root:

- download
Magisk-uninstaller-20190501.zip 2.21 MB- e3db7e9fa901e9c5a7a8cd05879bc207990679462781c2c2280753eb4ea903112e050e54880b7b7c7b44ad98f80d1535b0ebeb3a6159950bfb097911d08d0edf Magisk-uninstaller-20190501.zip
- Magisk-v19.1.zip
- sha512sum: 8be387bfad2555f7fed2f8686d9d2254e3e882960d5496a7002f5f459a9f54d0cab80948f3f23ab15149179a8f08959ab963cd653d2ef11b9d13f69d66507225 Magisk-v19.1.zipto your phone
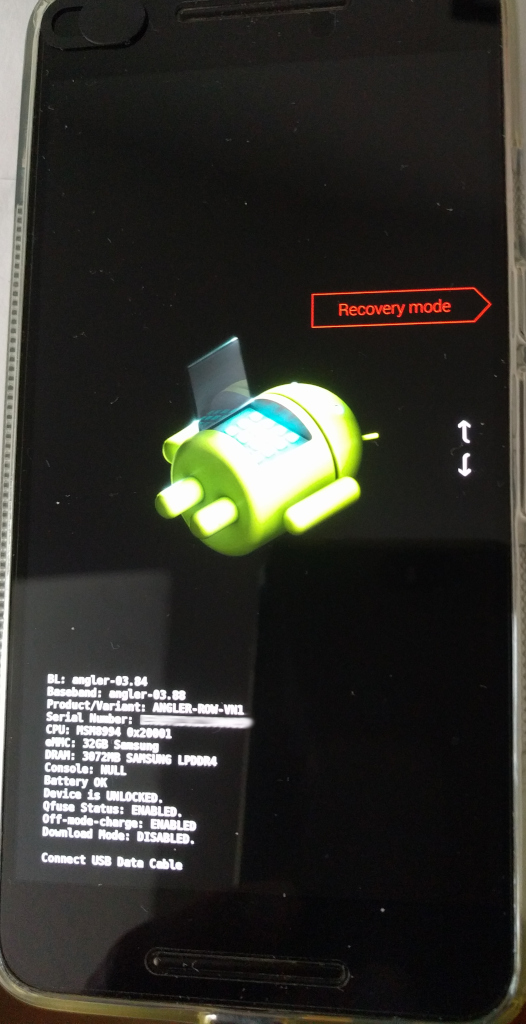
go into recovery mode:
- power phone off
- hold down power and volume+down
- chose “recovery mode” via volume buttons
- you should be TWRP boot loader
- select and flash Magisk-v19.1.zip
- there is also an app: Magisk Manager sha512sum: bd857cfe16536c9c032abe16762a7f9d6114d2b2246bba31473816f8c56361026085618412c108fb4116cae203d92cde11175c496c6c479d9b9506bf10e21877 MagiskManager-v7.1.2.apk
- get the latest version here
- looks like this:

- reboot
… why all this stress? so you can have a
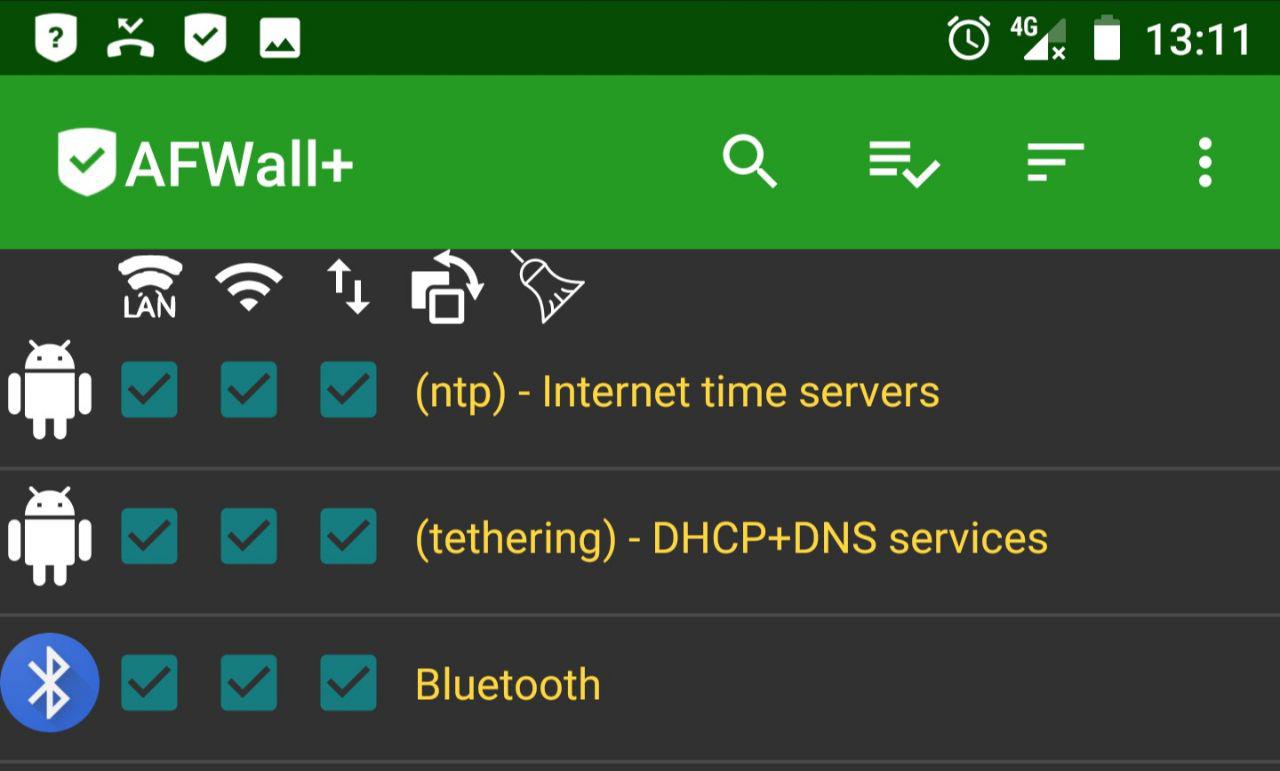
FIREWALL

WARNING! You will have to allow Teethering in the Firewall! Or you will not be able to use Teethering! (use SmartPhone as Wifi Hotspot/Router to mobile internet)

(thanks to kuketz-blog.de and all involved 🙂
direct link to AFWall+ https://f-droid.org/en/packages/dev.ukanth.ufirewall/
on your mobile device 🙂
why would you want a firewall on android?
to only allow specific devices to communicate with the internet and enhance your privacy.
what is forgotten in this video: you have to hit “BuildNumber” several times to enable developer mode…
https://github.com/topjohnwu/MagiskManager/releases
“Magisk is a suite of open source tools for customizing Android, supporting devices higher than Android 4.2 (API 17). It covers the fundamental parts for Android customization: root, boot scripts, SELinux patches, AVB2.0 / dm-verity / forceencrypt removals etc.
Furthermore, Magisk provides a Systemless Interface to alter the system (or vendor) arbitrarily while the actual partitions stay completely intact. With its systemless nature along with several other hacks, Magisk can hide modifications from nearly any system integrity verifications used in banking apps, corporation monitoring apps, game cheat detections, and most importantly Google’s SafetyNet API.”
https://github.com/topjohnwu/Magisk/
OpenSource! GREAT 🙂
https://github.com/topjohnwu/Magisk/releases
https://forum.xda-developers.com/apps/magisk/
“Magisk works systemless-ly, and it doesn’t modify or alter your system partition. If you want to install a banking application or if you want to install official OTA updates, and much more. You can install the OTA updates without losing the root privileges, and that is everyone need. They don’t need to root again and again.
Magisk roots your Android device and it is based on phh’s SuperUser. Magisk is an open source rooting solution for Android. If you want to install magisk, then you can do so with the help of Magisk Manager application.
Magisk has Universal Systemless Interface. It means that if you want to create your mod or app, you can do so with the help of magisk. Magisk is mostly same as Xposed Framework and in the Xposed framework, there are different modules which you can install on your device.
Unfortunately, the Xposed framework is not available for Android Nougat. You can use the Magisk Manager on your device, and the Xposed Framework is mixed into it, and you can install some modules on your device with the help of magisk manager. You can hide root from other applications.”
https://magiskmanager.com/
ultimate privacy enhacement:
- apply privacy enhancing front camera tape!
for windows users:
the SafteyNet: more of a problem than a solution
“However, a modified system partition can become a Problem since Google’s SafetyNet (similar to PC verison of verified/signed programms/Apps/TrustedComputing/SecureBoot/DRM etc.) service was introduced.
see LineageOS stance on SafetyNet.
SafetyNet is intended to detect” dangerous ” modifications such as Root and is intended to protect the app provider from potential misuse.
Especially when using Custom ROMs or rooted devices SafetyNet is becoming more and more a nuisance.
Among other things, apps such as Netflix, Snapchat, Banking Apps, and so on will deny the service if the SafetyNet Check fails.”
(auto translated from src: kuketz-blog.de)
Similar technology: Microsoft’s SecureBoot
“UEFI Secure Boot is not an attempt by Microsoft to lock Linux out of the PC market here; SB is a security measure to protect against malware during early system boot. Microsoft act as a Certification Authority (CA) for SB, and they will sign programs on behalf of other trusted organisations so that their programs will also run.” (src: debian.org, well spot the problem here, if “SecureBoot” has gained 90% market share in UEFI-BIOSES, they (Microsoft) will let the lock click… and that is it for Linux.)
see: EFF stance on TrustedComputing.
Other downloads:
Factory Image
https://dl.google.com/dl/android/aosp/angler-opm7.181205.001-factory-b75ce068.zip
sha256: b75ce068f23a0e793805f80fccbc081eca52861ef5eb080c47f502de4c3f9713
OTA Image
https://dl.google.com/dl/android/aosp/angler-ota-opm7.181205.001-abb36a2f.zip
sha256: abb36a2fddb08501f9a425b19e43200ac4d639bbf4e387bcfff206b28b7024fe
UNOFFICIAL LinageOS 17.1 and 18.1 for Nexus 6P (angler)
use at own risk!
how to build latest android for nexus 6p – https://lineageosroms.com/angler/#introduction
- https://forum.xda-developers.com/t/rom-unofficial-lineageos-17-1-for-nexus-6p-angler.4012099/
- https://androidfilehost.com/?w=files&flid=302684
Grab our recovery from the peripherals section and install it- actually did not do that
- update stock firmware to latest version (Android version: 8.1.0,Android security patch level: December 5, 2018)
- just went with installing zip via latest TWRP (twrp-3.5.2_9-0-angler.img)
- on TWRP “Install” screen: check the box: Wipe Dalvik Cache, and select the ROM zip to flash
- then flashed the zip again
- Through TWRP Recovery:
- Install Zip > Install Image > Choose ‘recovery.img‘ > Select partition ‘Recovery’ > Swipe to confirm flash
- Through Fastboot:
- Code:
fastboot flash recovery recovery.img
- Code:
- actually did not do that
- Install the lineage-17.1-20200819-UNOFFICIAL-angler.zip
- after flashing via TWRP, go back to TWRP “WIPE” and select “Format data” Partition
- or: in TWRP tap “REBOOT” but immediately hold power+volume-down to get back to TWRP Book menu
- it will ask again for PIN but fails (maybe leave empty)
- does not matter
- go to “WIPE”: wipe internal data partition “Format data”
Through Fastboot:fastboot -w
- Reboot into system and wait until the process finishes, it could take a little bit.
- After the installation is done, suggest waiting before using the phone because it usually goes into thermal throttling after installing a ROM.
- creditz: PixelBoot
- Download ROM Here – Lineage OS 17.1
- Download ROM Here – Lineage OS 18.1
https://www.getdroidtips.com/custom-rom-nexus-6p/
Instructions to Install:
- Make sure that you have downloaded all the required files on your device.
- Now, copy the TWRP image file, GApps file, and ROM zip file to your device internal storage.
- Next, reboot your Nexus 6P into recovery mode.
- You will boot into TWRP Recovery mode.
- In recovery menu, tap on Install button > Install Image > Select the TWRP Image file from the location where you have moved earlier.
- Swipe to confirm flash.
- Now, reboot to recovery mode again.
- In the TWRP menu, go to Wipe section.
- Select Advanced Wipe > Select the data, system, vendor (if mentioned), cache. Then swipe to wipe it.
- Flash the ROM zip file from the Install option.
- The system will be mounted already Uncheck it & Remount system and vendor (if mentioned) manually. Then flash Gapps zip file as well.
- Finally, reboot your phone into a new system. Wait for it, as the boot process will take a few minutes.
- That’s it. Enjoy! (src)
free open source hardware: what can users do?
Free Software is protecting your data – 2014 TEDx Richard Stallman Free Software Windows and the NSA
“where the user controls the program, not the program controls the user”
so there is no way around “Open Source (Open Layouts / CAD Plans) hardware”
- ask and pay (!) for products that respect the user’s privacy
- COVER TAPE FRONT CAM OF (surveillance) SmartPhone
- use great Open Source software like the easy to install GNU Linux Debian 10
- use LibreOffice instead of M$ Office or Google Docs
- it is Java based and works well (Writer = Word, Calc = Excel)
- use Mozilla (ex Netscape) Firefox instead of Chrome browser!
- it is available for ALL PLATFORMS (Windows, OSX, Linux)
- even as App for Android and IPhone
- while surely not perfect, Mozilla at least seems to try to protect the user’s private data (aka not upload it to Google/Facebook)
- alternative Smart Phones
- affordable! Pine64Phone NICE! https://www.pine64.org/pinephone/
- https://puri.sm/products/librem-5/
- well at $749.00 it is rather pricey but still cheaper than the latest IPhone (which is guranteed to spy on the user)
- https://magazine.odroid.com/article/odroid-go-advance-cell-phone-a-custom-built-and-coded-cell-phone/
- remove Google from existing SmartPhones
- alternatives to Google:
- https://yandex.com
- superb picture search
- https://duckduckgo.com
- runs on Amazon cloud… well X-D
- https://www.startpage.com/
- acts like a proxy between the user and Google
- https://yandex.com
- alternatives to gmail: https://mail.tutanota.com/
- use Thunderbird and Enigmail
- it will store the user’s mails ONLY in encrypted format (even when using gmail’s infrastructure)
- stay away from the cloud madness as much as the user can
- only share absolutely essential data with “the cloud” aka hybrid-cloud where the user stores 100% of data on a local server and uploads only the data that is not privacy intrusive and that really needs to be easily accessible via clouds
- instead of: cloud per default
- now the toughest: uninstall WhatsApp, WeChat and Telegram or move on to a different device not installing those Apps there
- they are all privacy intruding Apps
- or: remove the sim card, move the sim card over to (of course) Librem 5 or LineageOS enabled Phone
- leave the non-sim enabled phone with WhatsApp, WeChat and Telegram at home, not carrying around
- conferencing:
-
ASK YOUR GOVERNMENT TO BUILD THEIR OWN COMPUTERS! 🙂
- with a little investment! it can be done! see “building a RISCV based computer”
- this also needs to be done “ANYWAY” if citizens should be able to compute safely and securely in order to tackle the Intel SPECTRE and MELTDOWN problems

liked this article?
- only together we can create a truly free world
- plz support dwaves to keep it up & running!
- (yes the info on the internet is (mostly) free but beer is still not free (still have to work on that))
- really really hate advertisement
- contribute: whenever a solution was found, blog about it for others to find!
- talk about, recommend & link to this blog and articles
- thanks to all who contribute!