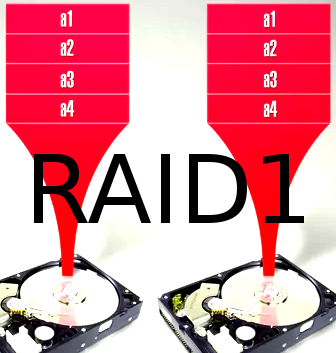
those two disks should become one md0 RAID1 mirroring array…
the hardware: what drives to use?
this was NEVER a problem in the past… so things become increasingly complicated as vendors try to push the limits of the technology, in order to increase capacity RAID-ability might have been lost.
- rule of thumb: exactly two identical drive models would be nice (exactly same model, same vendor)
- larger disks (2TB+X) is not better, because when one disk fails and is replaced, it can take many hours or even days to “sync” all data to the new device (especially if the server is in production use, slowing down the sync)
- do regular backups of the RAID, because even RAIDs ain’t perfect (when second harddisk fails while the 16TB harddisk are syncing… argh)
new factors:
- Do not use post-2019 WD Red drives
- Do not use post-2020 desktop drives in an array
- Unfortunately, it now seems that if you want to run an array, you can NOT use cheap 2020 or later drives.
- For the current state of affairs (mid 2020) WD has said that all the WD Red line (and also “Green”) is now Shingled magnetic recording (SMR) (bad).
- WD: To get raid-suitable CMR buy “WD Red Plus” (check sales on ebay) or “WD Red Pro” (more expensive check it on ebay).
- never have been using Seagate Barracudas anyway, but these have now pretty much all moved over to SMR (and been renamed BarraCuda).
- Seagate: have said that their “IronWolf” and “IronWolf Pro” lines will remain CMR, and the FireCuda line seems all CMR at the moment (guess these will be a bit like the Red Pros, the CMR equivalent of the BarraCuda).
- checkout this vendor (usually only recommends high quality hardware)
- why/reason/what’s wrong?:
- Pretty much all these drives are shingled and are completely unsuitable for raid, be warned that array creation and use may work fine.
- The problem is that replacing a drive may be impossible when one fails!
- Shingled Magnetic Recording is a method of storing data on magnetic disks.
- It represents a further development of Perpendicular Magnetic recording (PMR) and, in contrast to conventional methods, describes the magnetic disks not with strictly separated tracks but with overlapping tracks.
- The method increases the storage density of the hard drives. (but makes drive unsuitable for RAID).
- src: raid.wiki.kernel.org -> Timeout Mismatch
- how to test for RAID-ability:
-
if smartctl -l scterc,70,70 /dev/sdX > /dev/null ; then echo " is good"; else echo "no good sue vendor"; fi;scterc[,READTIME,WRITETIME] – [ATA only] prints values and descriptions of the SCT Error Recovery Control settings.
- These are equivalent to TLER (as used by Western Digital), CCTL (as used by Samsung and Hitachi/HGST) and ERC (as used by Seagate).
- READTIME and WRITETIME arguments (deciseconds) set the specified values.
- Values of 0 disable the feature, other values less than 65 are probably not supported.
- For RAID configurations, this is typically set to 70,70 deciseconds. (src: manpage of smartctl.man.txt)
-
script that shall be started on every start/boot to compensate for that problem:
vim /scripts/raid_correct_smr_drives.sh
#!/bin/bash
for i in /dev/sd? ; do
    if smartctl -l scterc,70,70 $i > /dev/null ; then
        echo -n $i " is good "
    else
        echo 180 > /sys/block/${i/\/dev\/}/device/timeout
        echo -n $i " is  bad "
    fi;
    smartctl -i $i | egrep "(Device Model|Product:)"
    blockdev --setra 1024 $i
done
# when done enable
chmod +x /scripts/*.sh
echo "/scripts/raid_correct_smr_drives.sh" >> /etc/rc.local
# tested on
hostnamectl
Operating System: CentOS Linux 8
CPE OS Name: cpe:/o:centos:centos:8
Kernel: Linux 4.18.0-240.10.1.el8_3.x86_64
Architecture: x86-64

# tested on
hostnamectl
   Static hostname: storagepc
         Icon name: computer-desktop
           Chassis: desktop
  Operating System: Debian GNU/Linux 9 (stretch)
            Kernel: Linux 4.9.0-11-amd64
      Architecture: x86-64

# *.deb
apt install smartmontools
# *.rpm
yum install smartmontools
# enable smart monitor service
systemctl start smartd ; systemctl enable smartd
# this generates pretty nice output
# define new alias command
alias harddisks='lsblk -o '\''NAME,MAJ:MIN,RM,SIZE,RO,FSTYPE,MOUNTPOINT,UUID'\'''
# run alias
harddisks
NAME      MAJ:MIN RM   SIZE RO FSTYPE            MOUNTPOINT
fd0         2:0    1     4K  0
sda         8:0    0 238.5G  0
├─sda1      8:1    0 230.8G  0 ext4              /
├─sda2      8:2    0     1K  0
└─sda5      8:5    0   7.7G  0 swap              [SWAP]
sdb         8:16   0   3.7T  0
└─sdb1      8:17   0   3.7T  0 linux_raid_member
  └─md127   9:127  0   3.7T  0 ext4              /media/user/ext4RAID1
sdc         8:32   0   3.7T  0
└─sdc1      8:33   0   3.7T  0 linux_raid_member
  └─md127   9:127  0   3.7T  0 ext4              /media/user/ext4RAID1
sdd         8:48   0   1.8T  0
└─sdd1      8:49   0   1.8T  0 linux_raid_member
  └─md126   9:126  0   1.8T  0 ext3              /media/user/ext3RAID1
sde         8:64   0   1.8T  0
└─sde1      8:65   0   1.8T  0 linux_raid_member
  └─md126   9:126  0   1.8T  0 ext3              /media/user/ext3RAID1

# raid1 will be recreated on those disks
# alternatively: list installed block devices
lsblk
NAME   MAJ:MIN RM   SIZE RO TYPE MOUNTPOINT
sda      8:0    0 931,5G  0 disk
└─sda1   8:1    0 931,5G  0 part
sdd      8:16   0   1,8T  0 disk
sdc      8:32   0  29,8G  0 disk
├─sdc1   8:33   0     1G  0 part [SWAP]
└─sdc2   8:34   0  28,8G  0 part /
sde      8:48   0   1,8T  0 disk
sr0     11:0    1  1024M  0 rom
sr1     11:1    1  1024M  0 rom
zram0  251:0    0   2,6G  0 disk [SWAP]

# create new partitions (scripted way unkown)
# so interactive way (fdisk and gparted are per default interactive programs)

# to erase all harddisk partitions filesystem meta information (and also all data) from harddisk
# WARNING! PICKING WRONG DRIVE LETTER WILL VERY EFFECTIVELY DESTROY ALL DATA ON THIS HARDDISK!
if=/dev/zero of=/dev/sdX
# let it run for a while (not long like 1-5min should be enough)

# alternative method
wipefs -a /dev/sdX
mdadm --zero-superblock /dev/sdX

fdisk /dev/sdb
# create new primary partition
n (new partition)
p (primary partition, hit enter, enter, enter to use the full disk as one big partition)
t (hit t then enter: fd followed by enter to label the partition "linux raid autodetect")
(for a list of all partition types look here)
w (hit w to write changes to disk)

# ... do the same with with all your disks.

# create new partitions with parted
parted -a optimal /dev/sde

GNU Parted 3.2
Using /dev/sde

Welcome to GNU Parted! Type 'help' to view a list of commands.

mklabel msdos

(parted) mkpart

Partition type?  primary/extended? p

File system type?  [ext2]? ext4

Start? 2048s

End? -1

(parted) set 1 raid on

(parted) align-check

alignment type(min/opt)  [optimal]/minimal? optimal

Partition number? 1
1 aligned
(parted) print
Model: ATA WDC WD20EARS-00M (scsi)
Disk /dev/sde: 2000GB
Sector size (logical/physical): 512B/512B
Partition Table: msdos
Disk Flags:

Number  Start   End     Size    Type     File system  Flags
 1      1049kB  2000GB  2000GB  primary  ext4         raid, lba

(parted) unit chs
(parted) print
Model: ATA WDC WD20EARS-00M (scsi)
Disk /dev/sde: 7660837,92,0
Sector size (logical/physical): 512B/512B
BIOS cylinder,head,sector geometry: 7660837,255,2.  Each cylinder is 261kB.
Partition Table: msdos
Disk Flags:

Number  Start  End           Type     File system  Flags
 1      4,4,0  7660833,32,1  primary               raid

(parted) q
Information: You may need to update /etc/fstab.

# same with the other disk

(parted) print
Model: ATA ST2000NM0033-9ZM (scsi)
Disk /dev/sdd: 2000GB
Sector size (logical/physical): 512B/512B
Partition Table: msdos
Disk Flags:

Number  Start   End     Size    Type     File system  Flags
 1      1049kB  2000GB  2000GB  primary  ext4         raid, lba

(parted) unit chs
(parted) print
Model: ATA ST2000NM0033-9ZM (scsi)
Disk /dev/sdd: 7660841,128,1
Sector size (logical/physical): 512B/512B
BIOS cylinder,head,sector geometry: 7660841,255,2.  Each cylinder is 261kB.
Partition Table: msdos
Disk Flags:

Number  Start  End           Type     File system  Flags
 1      4,4,0  7660837,36,1  primary  ext4         raid, lba

# it is possible to use harddisk of different sized
# (2TB Seagate != different amount of blocks than 2TB WD)
# start with smaller device (less blocks) (with missing parameter)
# then add the larger device to the raid1

# show model of harddisk
hdparm -I /dev/sdd|grep Model
	Model Number:       ST2000NM0033-9ZM175
# show blocksize
blockdev --report /dev/sdd
RO    RA   SSZ   BSZ   StartSec            Size   Device
rw  8192   512  4096          0   2000398934016   /dev/sdd <- this harddisk has +1081856 more blocks

# harddisk: get some health info
# harddisk: overall health status (usually PASSED)
smartctl -H /dev/sdd
# harddisk: show error log
smartctl -l error /dev/sdd
# harddisk: detailed smart info
smartctl -i /dev/sdd
smartctl -a -d ata /dev/sdd
# check if TRIM command is supported
smartctl -l scterc /dev/sdd

# show model of harddisk
hdparm -I /dev/sde|grep Model
	Model Number:       WDC WD20EARS-00MVWB0 <- this is a pretty old harddisk "Green" but it also seems to have the
# show blocksize
blockdev --report /dev/sde
RO    RA   SSZ   BSZ   StartSec            Size   Device
rw  8192   512   512          0   2000397852160   /dev/sde <- this harddisk has -1081856 less blocks will use this value for new partitions

# check what was before on those harddisks:
# print contents of the metadata stored on the named device(s)
mdadm --examine /dev/sdd /dev/sde
mdadm: No md superblock detected on /dev/sdd.
mdadm: No md superblock detected on /dev/sde.


# what raid devices are already existing?
ll /dev/md*
brw-rw----. 1 root disk 9, 127 2021-01-23 /dev/md127

/dev/md:
total 0
drwxr-xr-x.  2 root root   60 2021-01-23 .
drwxr-xr-x. 21 root root 3.5K 2021-01-23 ..
lrwxrwxrwx.  1 root root    8 2021-01-23 storagepc:2 -> ../md127

# create new one (if disks are equal model/size)
mdadm --create /dev/md0 --level=1 --raid-devices=2 /dev/sdd1 /dev/sde1

# create raid on smaller harddisk with "missing" parameter first
mdadm --create /dev/md0 --level=1 --raid-devices=2 /dev/sde1 missing
mdadm: Note: this array has metadata at the start and
may not be suitable as a boot device. If you plan to
store '/boot' on this device please ensure that
your boot-loader understands md/v1.x metadata, or use
--metadata=0.90
Continue creating array? (y/n) y
mdadm: Defaulting to version 1.2 metadata
mdadm: array /dev/md0 started.
# create filesystem on the newly created RAID1
mkfs.ext4 -L "ext4RAID2" /dev/md0
# mount it
mkdir /mnt/md0
mount /dev/md0 /mnt/md0
ll /mnt/md0
total 20K
drwxr-xr-x. 3 root root 4.0K 2021-01-23 .
drwxr-xr-x. 3 root root 17 2021-01-23 ..
drwx------. 2 root root 16K 2021-01-23 lost+found

#  two options:
# 1) build-sync raid1 disks now and restore the backuped data later (all 1010001 need to be 1:1 written from sde1 to sdd1)
# or
# 2) restore backuped data now to md0 and build-sync raid1 later
# both works
# both things take time
mdadm /dev/md0 --add /dev/sdd1
mdadm: added /dev/sdd1

# watch progress of raid1 rebuild/sync
# so system predicts at current speed rebuild/sync takes 6 hours
watch -n 2 cat /proc/mdstat;

Personalities : [raid1]
md0 : active raid1 sdd1[2] sde1[0]
      1953379328 blocks super 1.2 [2/1] [U_]
      [>....................]  recovery =  1.3% (25814720/1953379328) finish=395.1min speed=81292K/sec
      bitmap: 15/15 pages [60KB], 65536KB chunk

md127 : active (auto-read-only) raid1 sdb1[0] sdc1[1]
      3906886464 blocks super 1.2 [2/2] [UU]
      bitmap: 0/30 pages [0KB], 65536KB chunk

# is the user happy with raid config
# DO NOT FORGET TO SAVE RAID CONFIG
# TO PERMANENT CONFIG FILE (survives reboot)
mdadm --examine --scan > /etc/mdadm.conf
ARRAY /dev/md/2 metadata=1.2 UUID=xxxxxxxx:xxxxxxxx:xxxxxxxx:xxxxxxxx name=hostname:2
ARRAY /dev/md/0 metadata=1.2 UUID=xxxxxxxx:xxxxxxxx:xxxxxxxx:xxxxxxxx name=hostname.domain:0

# if user wants to create RAID10 (reliability of RAID1 + speed of RAID0)

# /dev/md0 should not be already in use
# maybe this parameter should not be given at all
# because as discovered Debian 9 automatically numerates the raid devices
# itself during next boot, so even attaching a usb device could change the md12... number
# means: next boot could fail "Control+D" prompt
# (no ssh login, need actual monitor access)
# use UUID in fstab instead of /dev/md0 /dev/md126
# and reboot and everything should be fine

# list all disks
ls -l /dev | grep sd;
brw-rw----. 1 root disk 8, 16 Jan 15 00:02 sdb
brw-rw----. 1 root disk 8, 17 Jan 15 00:02 sdb1
brw-rw----. 1 root disk 8, 32 Jan 14 23:50 sdc
brw-rw----. 1 root disk 8, 33 Jan 14 23:50 sdc1
brw-rw----. 1 root disk 8, 48 Jan 14 23:51 sdd
brw-rw----. 1 root disk 8, 49 Jan 14 23:51 sdd1
brw-rw----. 1 root disk 8, 64 Jan 14 23:51 sde
brw-rw----. 1 root disk 8, 65 Jan 14 23:51 sde1
brw-rw----. 1 root disk 8, 80 Jan 14 23:51 sdf
brw-rw----. 1 root disk 8, 81 Jan 14 23:51 sdf1
brw-rw----. 1 root disk 8, 96 Jan 14 23:51 sdg
brw-rw----. 1 root disk 8, 97 Jan 14 23:51 sdg1
brw-rw----. 1 root disk 8, 112 Jan 15 00:02 sdh
brw-rw----. 1 root disk 8, 113 Jan 15 00:02 sdh1 # hot spare
# if you want to create RAID10
mdadm --create /dev/md0 --level=10 --raid-devices=6 /dev/sd[b-g]1

mdadm: Note: this array has metadata at the start and
    may not be suitable as a boot device.  If you plan to
    store '/boot' on this device please ensure that
    your boot-loader understands md/v1.x metadata, or use
    --metadata=0.90
Continue creating array? Y
mdadm: Defaulting to version 1.2 metadata

mdadm: array /dev/md0 started.

mdadm --add /dev/md0 /dev/sdh1; # add hot spare

watch -n 2 cat /proc/mdstat; # now you will see it build the array

Every 2.0s: cat /proc/mdstat                                                                                                         Mon Jan 15 01:38:56 2018

Personalities : [raid10]
md0 : active raid10 sdh1[6](S) sdg1[5] sdf1[4] sde1[3] sdd1[2] sdc1[1] sdb1[0]
      5860147200 blocks super 1.2 512K chunks 2 near-copies [6/6] [UUUUUU]
      [>....................]  resync =  1.7% (102443584/5860147200) finish=532.3min speed=180266K/sec
      bitmap: 44/44 pages [176KB], 65536KB chunk

# now you have an new device md0 that represents your raid1-array

# lets format this new array and label it RAID10
mkfs.ext4 -L RAID10 /dev/md0

# it's a good idea to give it a meaningful label
e2label /dev/md0 "RAID1DATA"
Add entry to /etc/fstab:
# get uuid of raid
blkid
UUID=c308208c-46f7-4c46-b95a-dda3fac36bdb /run/media/username/RAID10 ext4 noatime,rw 0 0
if you use this moint point CentOS MATE Desktop CAJA (File Manager) will show it like this:
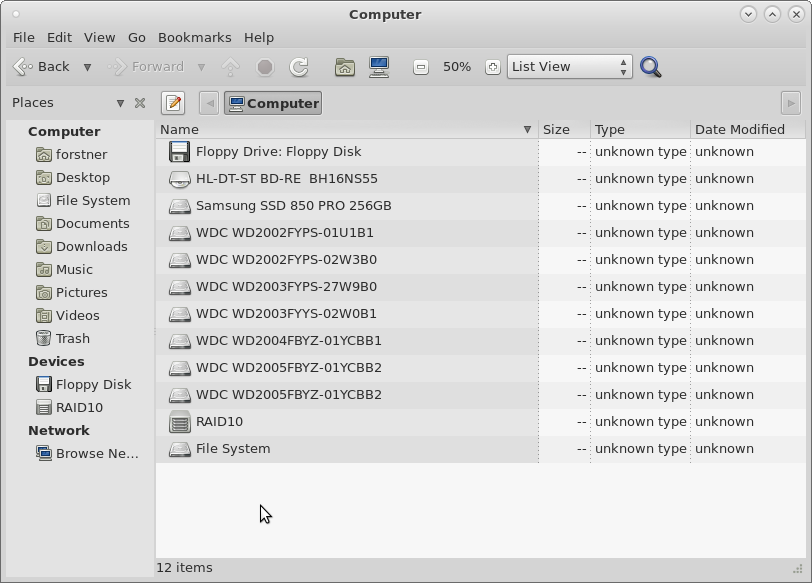
and you can mount it from the GUI by a click on RAID10. NEAT!
Create mdadm config file:
# test config output
root@Microknoppix:/home/knoppix# mdadm --examine --scan
ARRAY /dev/md/0 metadata=1.2 UUID=53ca5f4e:c16a6706:a216c510:5122e016 name=Microknoppix:0

# save config output to config file
root@Microknoppix:/home/knoppix# mdadm --examine --scan >> /etc/mdadm/mdadm.conf
Note that the array is actually started in /etc/rc0.d/K13mdadm-raid (via mdadm -A -s) or mdrun command
# test what would happen on reboot
/etc/rc0.d/K13mdadm-raid start

# sample output
[ ok ] Assembling MD array md0...done (started [2/2]).
[ ok ] Generating udev events for MD arrays...done.

# for auto mount of raid at boot
# creat mountpoint so it shows up in filemanager (debian 9 and 10)
mkdir /media/user/ext4RAID1

# creat mountpoint so it shows up in filemanager (Fedora/Redhat/CentOS)
mkdir /run/media/user/ext4RAID1

# fstab should look something like this
# ALWAYS USE UUIDs in fstab!
# md126 MIGHT CHANGE DURING NEXT BOOT to md127!
cat /etc/fstab
# <file system>                                 <mount point>         <type>  <options>         <dump>  <pass>
UUID=c308208c-46f7-4c46-b95a-dda3fac36bdb	/media/user/ext3RAID1 ext3    defaults		0	2
UUID=1fb6ee8e-c472-4095-bbf7-32d7e9f6d303	/media/user/ext4RAID1 ext4    errors=remount-ro	0       2
# dump = backup on boot? (not used a lot)
# pass = what order filesystem checks should be carried out on boot
# /dev/sda (assumed root device) should have 1
# all others 2 or maybe 3

# regular filesystem checks are important
# even when they take some time (ext4 fast, ext3 slow)
tune2fs -c 3 -i 7 /dev/md127
tune2fs -c 3 -i 7 /dev/md126
tune2fs 1.43.4 (31-Jan-2017)
Setting maximal mount count to 3
Setting interval between checks to 604800 seconds (7 days)
# to watch your raids at work
watch -n 2 cat /proc/mdstat
source: https://wiki.debian.org/SoftwareRAID
how to delete a raid:
su - root;
sync;
umount /media/user/mountpoint
mdadm --stop /dev/mdX
mdadm --remove /dev/mdX
# zero out superblock of all devices
mdadm --zero-superblock /dev/sdX
manpages:
Links:
https://raid.wiki.kernel.org/index.php/Linux_Raid
https://www.hostakers.com/kb/how-to-install-smartctl-utility-on-centos-7/
https://computingforgeeks.com/configuring-raid-storage-on-centos-linux/
liked this article?
- only together we can create a truly free world
- plz support dwaves to keep it up & running!
- (yes the info on the internet is (mostly) free but beer is still not free (still have to work on that))
- really really hate advertisement
- contribute: whenever a solution was found, blog about it for others to find!
- talk about, recommend & link to this blog and articles
- thanks to all who contribute!