Thanks for powerfull Open Source software such as blender!
(back in the ATARI days spend all money on a mathematical co-processor for the Falcon 030, so was able to run the super expensive (750,- BUCKS !!! in 1995) “Neon 3D Graphix” software… the combination managed to draw  ~350 polygons before it became stalling slow)
Youtube “howtos” and “tutorials” are GREAT! 😀 (Users learn from Users! That’s how it is supposed to be! That’s what mankind is about! That’s how mankind can evolve!)
Especially with such highly complicated software with zig-billions of options and functions, high quality howtos are important.
(whoever is growing up in the age of youtube and open source blender is blessed 😀 and be urged to extensively make use of these possibilities for the good of all conscious life THANKS! :D)
Prolem: Debian 11 per default comes with blender 2.83.5
- please ALWAYS state what exact version of software was used for this tutorial
- otherwise the tutorial-following-user might be looking for options that might not exist anymore or may not exist yet, which can be frustrating
so here is how to do it:
manual install newer version in 10sec:
- download multiple versions of blender (no need for flatpack or snapd) to the user’s local software repository /home/user/software
- unpack blender-x.x.x-linux-x64.tar.xz
-
hostnamectl; # tested and confirmed to work fine with this version of this software (!!! :D)
Operating System: Debian GNU/Linux 11 (bullseye)
Kernel: Linux 5.10.0-21-amd64

su - root; # become root
-
mv -v /usr/bin/blender /usr/bin/blender-2.83.5; # move old blender version out of the way -
ln -sv /home/user/software/blender/blender-3.5.0-linux-x64/blender /usr/bin/blender; # "install" new version of blender, by setting link to binary
# or if user downloaded the LTS (LongTermSupport) Version
ln -sv /home/user/software/blender/blender-3.4.1-linux-x64/blender /usr/bin/blender; # "install" new version of blender, by setting link to binary
be amazed…
that the option is now there ! 😀
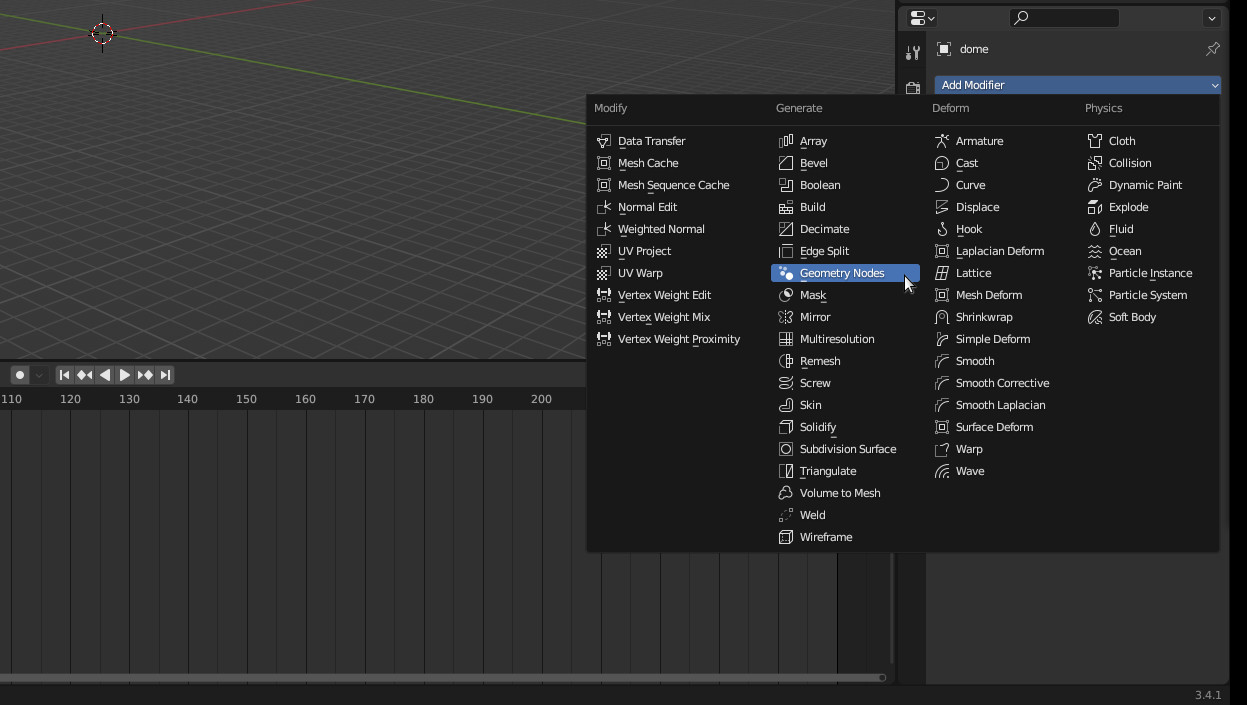
Add Filter Geometry Nodes in Blender 3.4.1
more completely useless ATARI 3D Raytracing history background of the Neon 3D software:
NeoN GRAFIX
The Pro-Falcon trend among developers fortunately continues: After APEX-Media, there is another Falcon-only product, NEON, with the help of which the user is enabled to create professional video sequences in the style of big motion pictures by fast ray tracing.
“Ah, a Falcon person! -I suppose you also believe that there is no more new software. But that’s not true! – It’s cool man!”
This or something similar greeted me a few weeks ago at TEAM-Computer in Cologne. “Just a moment please!” the gentleman in the red sweater continued before I had even taken a breath to ask a single question, while he pointed with a mischievous smile at the other customers in the store whose turn it was before mine. My eyes roamed warily over the shelves and monitors. But I couldn’t make out anything suspicious. I only noticed the other people present, who also seemed to be scanning the room with the question mark look. A cool program for the Falcon? If anything it’s a graphics demo or something similar, I thought. “So! -Then come closer!” In a flash, everyone present crowded in front of the 19″ monitor to which a Falcon was connected. “We have something new in computer graphics…” proudly explained the man with the red sweater, who was the only one with a seat. “A demo?!” it slipped from my lips, although I didn’t want to interrupt him at all.
Everyone stared at me as if this had been the wrong question. “No, no! What much nicer…” the man continued with a sardonic grin, as if he had only been waiting for my question, and all eyes were then again directed spellbound to the monitor.
…a new program for the creation of computer graphics and animated films in professional quality. You know …Terminator II, Jurassic Park & co…” the gentleman in red continued to announce as the graphic interface of the program appeared on the screen. “You can input and animate any objects you want.”
After about half an hour of demonstration, I and I think everyone else was pretty floored at what was going on with the good Falcon. “Be sure to visit us at ProTOS!” the gentleman with the red sweater told me on the way home, when a glance at the clock told me that the half hour had inexplicably turned into almost 3 hours.
The effects of the ProTOS can be briefly summarized as follows:
I came. I saw. I bought. The NeoN videotape. The demo disc. The program. However, a few more moons were to pass before my constant telephone terror at TEAM-Computer ensured that, surprisingly, a package arrived at my door 7 days ago.
This is its story
To take it in advance. The long wait was worth it. The current retail version (v1.2) of NeoN-Grafix, which is delivered data-compressed on 6 disks, contains several programs, many demo objects, animations, a lot of TGA textures, as well as special “maps” and “shapes” and last but not least a manual, whose extent already indicates the many possibilities. All in all, about 15MB of disk space are used on a hard disk partition.
Hardware requirements
All programs of the NeoN package currently run only on Atari Falcon030 computers with coprocessor in 256 color mode. NeoN also supports the higher resolutions of the Screenblaster extension. All programs can be run with minimal memory (1MB), but 4 or even better 14 MB RAM are desirable. The Falcon version is copy protected by a dongle that has to be plugged into the LAN port, which is probably a necessary evil for a program package of this price range.
Installation
After opening the mail package a week ago, I was afraid, in view of the 6 floppy disks with data-compressed contents, that one would first have to read half the manual before knowing in which hierarchy what should be unpacked where with which packer. Fortunately, this is a piece of cake thanks to the included InstallProgram. You can start right away without having to set 10000 paths. Very comfortable!
Concept
The graphical user interface, which recurs uniformly in all programs of the NeoN package, can be operated comfortably with the mouse. However, it is -presumably because of the display speed- unfortunately not designed to be GEM-compliant, but this is not a disadvantage for pure Atari users. On the contrary, this way a display speed is realized on the Falcon that other programs can only dream of. The different structure of the dialog boxes, the missing double click in the fileselect box and the missing “CANCEL buttons” can be annoying at first, but one gets used to these things relatively quickly. The missing “CANCEL” can be compensated by the UNDO function (undo object changes, “Nondestructive Editing”).
The concept of the NeoN software package is aimed at a wide variety of users. From the hobby filmmaker to the graphic artist, architect and designer to the musician who creates his own computer animations for his songs, which he might then place on VIVA or even MTV tomorrow or the day after tomorrow, all users are conceivable.
Previous experience with 3D computer graphics is not required with NeoN, but it can’t hurt either.
Neon-Convert
Advanced designers have the possibility to transfer their possibly already existing objects from other 3D programs into NeoN’s own format by means of the included “NeoN-Convert” and to process and animate them there. The current version supports the formats “.IOB” (Inshape) and “.3D2” (Cybersculpt). Further converters for “.3DS” (3D-Studio) and “.DXF” (e.g. Softimage) are in preparation according to TEAMComputer.
The conversion worked flawlessly in several tests with quickly obtained Inshape objects. However, the texture and surface properties can only be converted to a limited extent, since the parameters in the individual formats are probably different or some parameters are even missing completely. Here, after the conversion, it is therefore necessary to rework “by hand” so that the desired material impression is created. When purchasing NeoN, the user is already provided with a high-quality and large object library through “NeoN-Convert”, which can still be refined with NeoN features.
Neon Object Editor
If this is not enough, or if you prefer to design your own objects, you will find a powerful design tool in the NeoN-Object-Editor. Here, three-dimensional polygon objects can be created, deformed and assembled in various ways and provided with surface and material properties in the integrated material editor.
In addition to a menu bar and a status bar, the object editor contains four graphics windows corresponding to the views “frontal (2D)”, “right (2D)”, “from above (2D)” and “preview (3D)”. Each window can be enlarged to full screen size. Objects can be moved or zoomed in the window section as desired. This is all realized with the mouse buttons and held CTRL or ALTERNATE key.
For each window the settings are individually possible. In the “Preview” window, the current object can additionally be rotated and viewed around all axes in real time (!) in an area-shaded display (!!). However, with large objects there are sometimes quite long waiting times for the screen rebuild (“Redrawing Windows…”). These can be compensated for with the Hide/Unhide option (this can be used to hide object parts that are unimportant for editing, which of course speeds up the display) and the Fastmove function (automatic switching to box display during editing processes). Practical programming has been applied here, which is also reflected in the convenient UNDO operation.
As an alternative to the usual display, several display variants such as line and point display can be set in the object editor. In the Basic Objects area, the Object Editor offers simple bodies such as cuboids or spheres (approximated by a surface representation) as well as complex objects such as freely definable rotating bodies. Their underlying contours (“shapes”) can even be saved and loaded separately.
I particularly liked the “3D text” function, which has never been implemented in such a simple way in any 3D program I know. You simply select a character set, type in your text and you get a three-dimensional text, which you can of course edit further – ideal for logo animations or video titles.
Also the deforming of the object editor shows itself very complete. From “simple rounding” to “crushed cola can”, all deformation effects can be realized here.
In the Morph menu you can achieve smooth transitions between different 3D objects and their colors (“morphing”), which then looks very spectacular in a finished animation.
Of course, there is not enough space in this review to describe all the functions of the Object Editor. Only this much: Everything makes a clean and well thought-out impression. There have been no crashes so far. All parameters can be set in such a differentiated way that even the most abstruse 3D object can be created.
Material editor (bath i)
The material editor is integrated into the object editor. In addition to a wide range of parameter controls for surface color, roughness, reflection, transparency and structure, for example, there is also a “Preview” window in which the current material settings can be displayed either as a sphere and/or surface. Here, too, you can see the effects of the parameters at any time.
NeoN comes with many textures (e.g. wood, stone and metal) in excellent quality. You can even place your own TGA images as textures on the 3D bodies or modify them in the material editor in a variety of ways.
So there are hardly any wishes left unfulfilled in the material editor. Personally, I would find a material import and export with all parameter settings advantageous, but according to TEAM-Computer this is planned for the next update.
Neon Tools
The external program “NeoN-Tools” offers even more advanced editing operations for textures like scaling and changing contrast and some other help programs for working with NeoN.
Scenery Editor
What good are the most beautiful objects if you can’t display them in high color and resolution quality? This is exactly what the Scenery Editor in the NeoN package is for, to set objects in “scene”. The Object Editor can be invoked by simply clicking on an object from the Scenery Editor. The display and window operations are analogous.
In the Scenery Editor, the individual objects are first placed and illuminated. The light sources can be freely adjusted in color, beam angle and brightness gradient. Then a camera is defined that can record the finished scene. All settings are possible, from extreme wide-angle to telephoto. The real highlight of the Scenery Editor, however, are the tremendous animation possibilities. Time-modulated curves (“time-splines”) can be entered for all objects, so that the objects move with different speeds and motion changes on the curves. This can be viewed (I’m inclined to say naturally) again in the 3D preview, ironing out gross design errors. Even light sources and “splines” can be connected to the curves and thus moved. There are no limits to the imagination.
To display the finished scene or animation, either the renderer (Z-buffer algorithm) or ray tracer (for shadows and reflections) is optionally switched on, which after some time delivers the finished TGA image or, in the case of an animation, an image sequence.
The phong shading and ray tracing times for a single image are the shortest I have ever seen on a Falcon. In most cases, you can watch the drawing without getting bored. Compared to products like InShape, for example, NeoN is way ahead of the game.
Show
With the ShowAnim program of the NeoN package, the TGA images of a calculated NeoN animation can be smoothly played back and output to video via the Falcon output. Thereby it is possible to multiply the displayable number of images, which is limited by the RAM expansion, by loop or bidirectional playback. With 14MB RAM, 89 different images were possible on my Falcon, which corresponds to 3 1/2 seconds of animation (without loop). However, animations that “loop” after the maximum number of frames are particularly appealing.
Conclusion
With NeoN-Graphix, TEAM-Computer has succeeded in bringing a really mature and extremely powerful program package for creating computer graphics and animations to the Falcon market, which is not exactly spoiled by software. How powerful the software is is impressively documented by the 10 minute demo video that is included with each program package. After a short time, however, the operation, which initially takes some getting used to, no longer proves to be a nuisance.
The many examples, the extensive delivery accessories and the easy-to-understand and well-structured manual, despite the complex subject matter, round off the thoroughly positive picture.
The price of about 750 DM is not as low as I would have liked, but you get a lot for your money. For example, all registered NeoN users can also take part in a free training course for the program and have their own animations recorded with professional video equipment at TEAMComputer for a small fee. I am eagerly awaiting the next update. <- damn, did not know that, as there was no www in those days!
Until then, I will remain with the test verdict: First class or better said: It’s cool man!
translated from source: https://www.stcarchiv.de/ai1995/03/neon-grafix
liked this article?
- only together we can create a truly free world
- plz support dwaves to keep it up & running!
- (yes the info on the internet is (mostly) free but beer is still not free (still have to work on that))
- really really hate advertisement
- contribute: whenever a solution was found, blog about it for others to find!
- talk about, recommend & link to this blog and articles
- thanks to all who contribute!