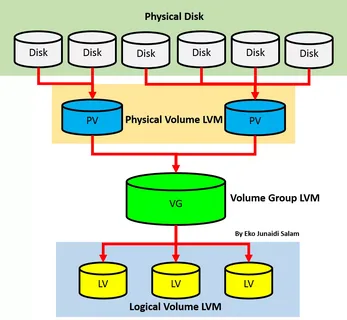
lvm2 concept:
tested on:
debian 8-9 and compatible, manpages from centos7/rhel7
in general
backup! backup! backup!
before fiddeling with partitions and the filesystem…
logical volumes basically allow you to span partitions over several disks/partitions as well as resize those partitions.
windows calls this “dynamic partitions”.
it will take some practice to get used to it…
the user can never have enough harddisk space, right?
even better if you can dynamically extend the capacility of data partitions – without even rebooting the system. (they should be in some sort of RAID1 6 or 10 if you care about your data)
limits:
- how many logical volumes can be in a volume group?
- ChatGPT says: “As of my last update in January 2022, there isn’t a hard-coded limit for the number of logical volumes per volume group in LVM2”
the plan is:
- create 3 partitions
- combine two 10GB partitions/harddisks to one 20GB volume group
- create a 15GB logical volume/dynamic partition
- increase the size of the dynamic partition from 15GB to 20GB (100%)
- add a third partition/harddisk to increase the size of the dynamic partition to 25GB
create 3 partitions
apt-get install lvm2; # install needed software

# actually, there is no need to create partitions
# but it is possible to create a volume group
# with partitions

fdisk /dev/sdb; # create two new partitions sdb1 and sdb2 (you will have to do this twice)
n    # new partition
p    # primary
     # take default partition number just hit enter
     # start cylinder as default just hit enter
+10G # each 10GByte in size
t    # type will be...
8e   # lvm
w    # write and quit

# repeat those steps 3 times to add 3 partitions to the harddisk
Re-reading the partition table failed.: Device or resource busy
partprobe
# initialize a disk or partition for use by LVM, read the manpage what this does: pvcreate.man.txt
pvcreate /dev/sdb1
pvcreate /dev/sdb2
pvcreate /dev/sdb3

# or directly with harddisks
pvcreate /dev/sdb
pvcreate /dev/sdc
pvcreate /dev/sdd

fdisk -l # checkout what has been created
combine two 10GB partitions/harddisks to one 20GB volume group
# create a volume group, manpage: vgcreate.man.txt
vgcreate vg1 /dev/sdb1 /dev/sdb2
create a 15GB logical volume/dynamic partition
# create a logical volume in an existing volume group, manpage: lvcreate.man.txt
lvcreate -L 15G -n DynamicPartition1 vg1

mkfs.ext4 /dev/vg1/DynamicPartition1 -L "DynamicPartition1"; # ext4 formats faster than ext3 ;)

# now it can be mounted
mkdir -p /media/user/DynamicPartition1
mount /dev/vg1/DynamicPartition1 /media/user/DynamicPartition1

# there u have it
# a logical volume 3x times the size of the actual harddisk size
df -h|grep logical
/dev/mapper/vg1-logical--volume--1 3.0T 28K 2.9T 1% /media/user/logical-volume-1

lsblk
NAME MAJ:MIN RM SIZE RO TYPE MOUNTPOINT
fd0 2:0 1 4K 0 disk
sda 8:0 0 127G 0 disk
├─sda1 8:1 0 126G 0 part /
├─sda2 8:2 0 1K 0 part
└─sda5 8:5 0 1021M 0 part [SWAP]
sdb 8:16 0 127G 0 disk
├─sdb1 8:17 0 10G 0 part
│ └─vg1-DynamicPartition1 253:0 0 15G 0 lvm
├─sdb2 8:18 0 10G 0 part
│ └─vg1-DynamicPartition1 253:0 0 15G 0 lvm
└─sdb3 8:19 0 10G 0 part
sr0 11:0 1 1024M 0 rom

# alternative way to view display logical volume groups
# and volumes
find /dev/vg1/
/dev/vg1/
/dev/vg1/logical-volume-1
/dev/vg1/logical-volume-2

find /dev/mapper/
/dev/mapper/
/dev/mapper/vg1-logical-volume-1
/dev/mapper/vg1-logical-volume-2

# btw is a symbolic link to
/dev/mapper/vg1-logical-volume-1 -> ../dm-0

file /dev/mapper/vg1-logical-volume-1
/dev/mapper/vg1-logical-volume-1: symbolic link to ../dm-0
test mount
mkdir -p /mnt/vg1/DynamicPartition1

mount /dev/vg1/DynamicPartition1 /mnt/vg1/DynamicPartition1

df -Th|grep Dynamic
/dev/mapper/vg1-DynamicPartition1 ext4 15G 41M 14G 1% /mnt/vg1/DynamicPartition1

# now lets fill up that space with useless data
dd if=/dev/zero of=/mnt/vg1/DynamicPartition1/16GBybe.testfile bs=64M count=256 iflag=fullblock; # generate 16GByte test file that contains zeros (faster than random)

# or alternatively use REAL data
# and copy it a lot
# use checksums to verify integrity of stored data before-after
dd: error writing '/mnt/vg1/DynamicPartition1/16GBybe.testfile': No space left on device
235+0 records in
234+0 records out
15727505408 bytes (16 GB, 15 GiB) copied, 15.9664 s, 985 MB/s
df -Th|grep Dynamic; # proofs that the dynamic partition is in fact FULL
/dev/mapper/vg1-DynamicPartition1 ext4 15G 15G 0 100% /mnt/vg1/DynamicPartition1
increase the size of the dynamic partition from 15GB to 20GB (100%)
# extend the size of a logical volume, manpage: lvextend.man.txt

lvextend -l +100%FREE /dev/mapper/vg1-DynamicPartition1; # this would extend to the maximum (20GByte)

Size of logical volume vg1/DynamicPartition1 changed from 15.00 GiB (3840 extents) to 19.99 GiB (5118 extents).
Logical volume vg1/DynamicPartition1 successfully resized.

resize2fs -p /dev/mapper/vg1-DynamicPartition1; # tells the filesystem to resize as well

resize2fs 1.43.4 (31-Jan-2017)
Filesystem at /dev/mapper/vg1-DynamicPartition1 is mounted on /mnt/vg1/DynamicPartition1; on-line resizing required
old_desc_blocks = 2, new_desc_blocks = 3
The filesystem on /dev/mapper/vg1-DynamicPartition1 is now 5240832 (4k) blocks long.

df -Th|grep Dynamic
/dev/mapper/vg1-DynamicPartition1 ext4 20G 15G 4.0G 79% /mnt/vg1/DynamicPartition1
fun enough – have turned two partitions/harddisks of each 10GB into a partition of 15GB and then increased the size of that to 20GB – all live – without taking server offline or unmount a partition…
add a third partition/harddisk to increase the size of the dynamic partition to 25GB
vgextend vg1 /dev/sdb3
Volume group "vg1" successfully extended

lvextend -L 25G /dev/mapper/vg1-DynamicPartition1; # this would extend to the maximum (20GByte)
Size of logical volume vg1/DynamicPartition1 changed from 19.99 GiB (5118 extents) to 25.00 GiB (6400 extents).
Logical volume vg1/DynamicPartition1 successfully resized.

# extend partition to maximum size available
lvextend -l +100%FREE /dev/mapper/vg1-DynamicPartition1

resize2fs -p /dev/mapper/vg1-DynamicPartition1; # tells the filesystem to resize as well

df -Th|grep Dynamic
/dev/mapper/vg1-DynamicPartition1 ext4 25G 15G 8.7G 63% /mnt/vg1/DynamicPartition1
holy moly… wasn’t that hard was it? 😀 now repeat another 20 times and you will get the hang of it.
shrink: WARNING: DANGER! 😀
- while increasing the size of a volume is usually no problem
- reducing the size of an ext4 filesystem or a logical volume is also possible but a wee bit more effort and danger
- it is supported to GROW a live ext4 filesystem, it is UNSUPPORTED to shrink a live ext4 filesystem (as it needs to be unmounted before shrinking)! solution: boot from a usb live stick or iso a “rescue” system
- before shrinking:
- make sure to have a backup or restorable snapshot of the partition or harddisk in question
- make sure the volume group has still enough space
- create sha512sum checksum of files in order to verify, everything is ok before-after
-
cd /media/user/logical-volume-1
sha512sum *files* > sha512sums
- before shrinking:
- run a file system check to see if everything is ok with the volume
umount /media/user/logical-volume-1
e2fsck -f /dev/mapper/vg1-logical--volume--1

# shrinking the ext4 filesystem
resize2fs /dev/mapper/vg1-logical--volume--1 2T

# run filesystem check again
fsck -y -v -f /dev/mapper/vg1-logical--volume--1

# reducing the logical volume size
lvreduce -L 2T /dev/mapper/vg1-logical--volume--1
WARNING: Reducing active logical volume to 2.00 TiB.
THIS MAY DESTROY YOUR DATA (filesystem etc.)
Do you really want to reduce vg1/logical-volume-1? [y/n]: y
Size of logical volume vg1/logical-volume-1 changed from <3.00 TiB (786176 extents) to 2.00 TiB (524288 extents).
Logical volume vg1/logical-volume-1 successfully resized.

# run filesystem check again
fsck -y -v -f /dev/mapper/vg1-logical--volume--1

# try to mount
mount /dev/vg1/logical-volume-1 /media/user/logical-volume-1

# all data should still be there and intact :)
sha512sum -c sha512sums
snapshots
lvm snapshots seem to be conceptional very different from snapshots of e.g. a virtual machine.
they are not meant to stay there forever (bad for performance of the dynamic partition).
a lvm snapshot is to only meant to temporarily open a read-only window to backup the original filesystem/files with whatever program you would like to use.
this means – usually only one snapshot will exist – and after the backup software has done it’s job – the snapshot should be deleted – temporary changes applied.
lvcreate -L 1G -s -n DynamicPartition1Snapshot /dev/vg1/DynamicPartition1
Using default stripesize 64.00 KiB.
Logical volume "DynamicPartition1Snapshot" created.

mkdir /mnt/vg1/DynamicPartition1Snapshot
mount /dev/vg1/DynamicPartition1Snapshot /mnt/vg1/DynamicPartition1Snapshot

# now write A LOT of test-data to it :D

# both directories look the same
# /mnt/vg1/DynamicPartition1
# /mnt/vg1/DynamicPartition1Snapshot

df -Th|grep Dynamic
/dev/mapper/vg1-DynamicPartition1         ext4 25G 15G 8.7G 63% /mnt/vg1/DynamicPartition1
/dev/mapper/vg1-DynamicPartition1Snapshot ext4 25G 15G 8.7G 63% /mnt/vg1/DynamicPartition1Snapshot

lsblk|grep Dynamic
│ └─vg1-DynamicPartition1-real 253:1 0 25G 0 lvm
│ ├─vg1-DynamicPartition1 253:0 0 25G 0 lvm /mnt/vg1/DynamicPartition1
│ └─vg1-DynamicPartition1Snapshot 253:3 0 25G 0 lvm /mnt/vg1/DynamicPartition1Snapshot
│ └─vg1-DynamicPartition1-real 253:1 0 25G 0 lvm
│ ├─vg1-DynamicPartition1 253:0 0 25G 0 lvm /mnt/vg1/DynamicPartition1
│ └─vg1-DynamicPartition1Snapshot 253:3 0 25G 0 lvm /mnt/vg1/DynamicPartition1Snapshot
 ├─vg1-DynamicPartition1-real 253:1 0 25G 0 lvm
 │ ├─vg1-DynamicPartition1 253:0 0 25G 0 lvm /mnt/vg1/DynamicPartition1
 │ └─vg1-DynamicPartition1Snapshot 253:3 0 25G 0 lvm /mnt/vg1/DynamicPartition1Snapshot
 └─vg1-DynamicPartition1Snapshot-cow 253:2 0 1G 0 lvm
 └─vg1-DynamicPartition1Snapshot 253:3 0 25G 0 lvm /mnt/vg1/DynamicPartition1Snapshot

# adding some changes to the original dynamic partition
echo "this file was newly added while the snapshot was active" > /mnt/vg1/DynamicPartition1/newfile

# the newly created file appears in the dynamic partition, but not in the snapshot partition
ll /mnt/vg1/DynamicPartition1
total 15G
drwxr-xr-x 3 root root 4.0K Jul 5 16:18 .
drwxr-xr-x 5 root root 4.0K Jul 5 16:10 ..
-rw-r--r-- 1 root root 15G Jul 5 15:07 16GBybe.testfile
drwx------ 2 root root 16K Jul 5 14:57 lost+found
-rw-r--r-- 1 root root 56 Jul 5 16:16 newfile

ll /mnt/vg1/DynamicPartition1Snapshot
total 15G
drwxr-xr-x 3 root root 4.0K Jul 5 15:06 .
drwxr-xr-x 5 root root 4.0K Jul 5 16:10 ..
-rw-r--r-- 1 root root 15G Jul 5 15:07 16GBybe.testfile
drwx------ 2 root root 16K Jul 5 14:57 lost+found

# now you can backup /mnt/vg1/DynamicPartition1Snapshot
# after backup is done the snapshot partition should be removed again like this:

umount /mnt/vg1/DynamicPartition1Snapshot
lvremove /dev/vg1/DynamicPartition1Snapshot
remove:
now how to remove all of this again?
vgremove vg1
Do you really want to remove volume group "vg1" containing 1 logical volumes? [y/n]: y
Do you really want to remove active logical volume vg1/DynamicPartition1? [y/n]: y
 Logical volume "DynamicPartition1" successfully removed
 Volume group "vg1" successfully removed
upgrading root harddisk for a larger one?
that is possible.
this article was pretty usefull:
https://help.ubuntu.com/community/ResizeEncryptedPartitions
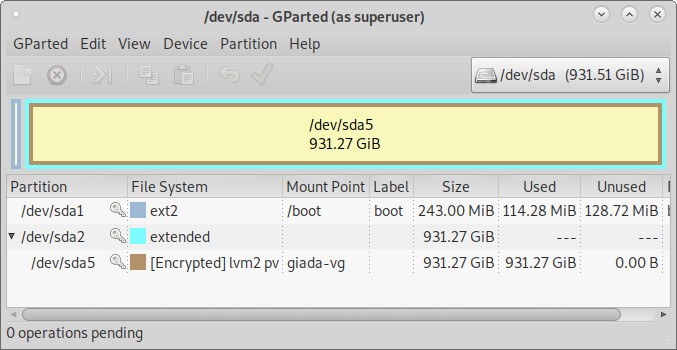
this is the default layout of Debian 10 installer using lvm2 encrypted harddisk with all stuff in one partition (/root /home)
gparted “can not see” inside the logical volumes inside that lvm2 encrypted harddisk partition
so how to upgrade/resize to a larger harddisk?
- SATA USB connect the new harddisk
- boot from an external USB Stick / LiveCD
- 1:1 dd copy the smaller harddisk to the larger harddisk
-
dd if=/dev/old-harddisk of=/dev/new-harddisk; sync;
-
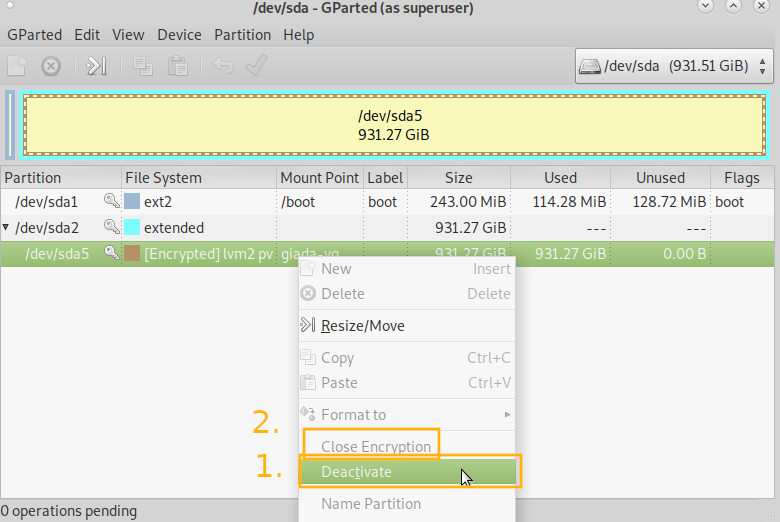
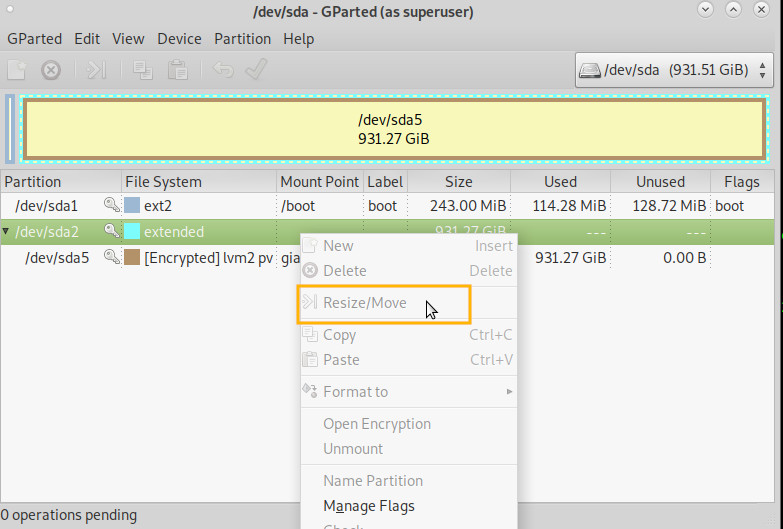
using gparted to extend to maximum the “extended” partition:
su - root
lsb_release -a
Description:	Debian GNU/Linux 10 (buster)
alias harddisks='lsblk -o '\''NAME,MAJ:MIN,RM,SIZE,RO,FSTYPE,MOUNTPOINT,UUID'\'''
harddisks
NAME                          MAJ:MIN RM   SIZE RO FSTYPE      MOUNTPOINT
sda                             8:0    0 931.5G  0
├─sda1                          8:1    0   243M  0 ext2        /boot <- boot partition (not encrypted)
├─sda2                          8:2    0     1K  0
└─sda5                          8:5    0 931.3G  0 crypto_LUKS      <- encrypted container
  └─sda5_crypt                253:0    0 931.3G  0 LVM2_member
    ├─giada--vg-root          253:1    0    28G  0 ext4        /     <-containing those logical volumes
    ├─giada--vg-swap_1        253:2    0   7.9G  0 swap        [SWAP]
    └─giada--vg-home          253:3    0 895.4G  0 ext4        /home

pvdisplay
  --- Physical volume ---
  PV Name               /dev/mapper/sda5_crypt
  VG Name               giada-vg
  PV Size               <931.26 GiB / not usable 3.00 MiB
  Allocatable           NO
  PE Size               4.00 MiB
  Total PE              238401
  Free PE               0
  Allocated PE          238401

vgdisplay
  --- Volume group ---
  VG Name               giada-vg
  System ID
  Format                lvm2
  Metadata Areas        1
  Metadata Sequence No  9
  VG Access             read/write
  VG Status             resizable
  MAX LV                0
  Cur LV                3
  Open LV               3
  Max PV                0
  Cur PV                1
  Act PV                1
  VG Size               931.25 GiB
  PE Size               4.00 MiB
  Total PE              238401
  Alloc PE / Size       238401 / 931.25 GiB
  Free  PE / Size       0 / 0

 lvdisplay
  --- Logical volume ---
  LV Path                /dev/giada-vg/root
  --- Logical volume ---
  LV Path                /dev/giada-vg/swap_1
  --- Logical volume ---
  LV Path                /dev/giada-vg/home <- this is the one that should be grown to maximum capacity of the new harddisk

lvresize -l +100%FREE /dev/mapper/giada--vg-home
fsck -y -v -f /dev/mapper/giada--vg-home
pvchange -x n /dev/mapper/sda5_crypt
e2fsck -f /dev/mapper/giada--vg-home
resize2fs -p /dev/mapper/giada--vg-home
fsck -y -v -f /dev/mapper/giada--vg-home
inspired by: https://help.ubuntu.com/community/ResizeEncryptedPartitions
about lvm in debian9
just for you information – it might be different for other distros but in debian9 most pv* commands are simply soft links to lvm binary
which lvm
/sbin/lvm
file /sbin/lvm
/sbin/lvm: ELF 64-bit LSB shared object, x86-64, version 1 (SYSV), dynamically linked, interpreter /lib64/ld-linux-x86-64.so.2, for GNU/Linux 2.6.32, BuildID[sha1]=be32da01a81536de8de17aa0807f88e3e6d28c1e, stripped

ll /sbin/pv*
lrwxrwxrwx 1 root root 3 Mar 17 17:29 /sbin/pvchange -> lvm
lrwxrwxrwx 1 root root 3 Mar 17 17:29 /sbin/pvck -> lvm
lrwxrwxrwx 1 root root 3 Mar 17 17:29 /sbin/pvcreate -> lvm
lrwxrwxrwx 1 root root 3 Mar 17 17:29 /sbin/pvdisplay -> lvm
lrwxrwxrwx 1 root root 3 Mar 17 17:29 /sbin/pvmove -> lvm
lrwxrwxrwx 1 root root 3 Mar 17 17:29 /sbin/pvremove -> lvm
lrwxrwxrwx 1 root root 3 Mar 17 17:29 /sbin/pvresize -> lvm
lrwxrwxrwx 1 root root 3 Mar 17 17:29 /sbin/pvs -> lvm
lrwxrwxrwx 1 root root 3 Mar 17 17:29 /sbin/pvscan -> lvm
ll /sbin/lv*
lrwxrwxrwx 1 root root    3 Mar 17 17:29 /sbin/lvchange -> lvm
lrwxrwxrwx 1 root root    3 Mar 17 17:29 /sbin/lvconvert -> lvm
lrwxrwxrwx 1 root root    3 Mar 17 17:29 /sbin/lvcreate -> lvm
lrwxrwxrwx 1 root root    3 Mar 17 17:29 /sbin/lvdisplay -> lvm
lrwxrwxrwx 1 root root    3 Mar 17 17:29 /sbin/lvextend -> lvm
-rwxr-xr-x 1 root root 1.7M Mar 17 17:29 /sbin/lvm
lrwxrwxrwx 1 root root    3 Mar 17 17:29 /sbin/lvmchange -> lvm
-rwxr-xr-x 1 root root  13K Mar 17 17:29 /sbin/lvmconf
lrwxrwxrwx 1 root root    3 Mar 17 17:29 /sbin/lvmconfig -> lvm
lrwxrwxrwx 1 root root    3 Mar 17 17:29 /sbin/lvmdiskscan -> lvm
-rwxr-xr-x 1 root root  11K Mar 17 17:29 /sbin/lvmdump
-rwxr-xr-x 1 root root  67K Mar 17 17:29 /sbin/lvmetad
-rwxr-xr-x 1 root root  60K Mar 17 17:29 /sbin/lvmpolld
lrwxrwxrwx 1 root root    3 Mar 17 17:29 /sbin/lvmsadc -> lvm
lrwxrwxrwx 1 root root    3 Mar 17 17:29 /sbin/lvmsar -> lvm
lrwxrwxrwx 1 root root    3 Mar 17 17:29 /sbin/lvreduce -> lvm
lrwxrwxrwx 1 root root    3 Mar 17 17:29 /sbin/lvremove -> lvm
lrwxrwxrwx 1 root root    3 Mar 17 17:29 /sbin/lvrename -> lvm
lrwxrwxrwx 1 root root    3 Mar 17 17:29 /sbin/lvresize -> lvm
lrwxrwxrwx 1 root root    3 Mar 17 17:29 /sbin/lvs -> lvm
lrwxrwxrwx 1 root root    3 Mar 17 17:29 /sbin/lvscan -> lvm

ll /sbin/vg*
lrwxrwxrwx 1 root root 3 Mar 17 17:29 /sbin/vgcfgbackup -> lvm
lrwxrwxrwx 1 root root 3 Mar 17 17:29 /sbin/vgcfgrestore -> lvm
lrwxrwxrwx 1 root root 3 Mar 17 17:29 /sbin/vgchange -> lvm
lrwxrwxrwx 1 root root 3 Mar 17 17:29 /sbin/vgck -> lvm
lrwxrwxrwx 1 root root 3 Mar 17 17:29 /sbin/vgconvert -> lvm
lrwxrwxrwx 1 root root 3 Mar 17 17:29 /sbin/vgcreate -> lvm
lrwxrwxrwx 1 root root 3 Mar 17 17:29 /sbin/vgdisplay -> lvm
lrwxrwxrwx 1 root root 3 Mar 17 17:29 /sbin/vgexport -> lvm
lrwxrwxrwx 1 root root 3 Mar 17 17:29 /sbin/vgextend -> lvm
lrwxrwxrwx 1 root root 3 Mar 17 17:29 /sbin/vgimport -> lvm
lrwxrwxrwx 1 root root 3 Mar 17 17:29 /sbin/vgimportclone -> lvm
lrwxrwxrwx 1 root root 3 Mar 17 17:29 /sbin/vgmerge -> lvm
lrwxrwxrwx 1 root root 3 Mar 17 17:29 /sbin/vgmknodes -> lvm
lrwxrwxrwx 1 root root 3 Mar 17 17:29 /sbin/vgreduce -> lvm
lrwxrwxrwx 1 root root 3 Mar 17 17:29 /sbin/vgremove -> lvm
lrwxrwxrwx 1 root root 3 Mar 17 17:29 /sbin/vgrename -> lvm
lrwxrwxrwx 1 root root 3 Mar 17 17:29 /sbin/vgs -> lvm
lrwxrwxrwx 1 root root 3 Mar 17 17:29 /sbin/vgscan -> lvm
lrwxrwxrwx 1 root root 3 Mar 17 17:29 /sbin/vgsplit -> lvm
more testing:
manpages:
hostnamectl
   Static hostname: webserver2.vm
  Operating System: CentOS Linux 7 (Core)
       CPE OS Name: cpe:/o:centos:centos:7
            Kernel: Linux 5.X
      Architecture: x86-64

yum info lvm2.x86_64
Installed Packages
Name        : lvm2
Arch        : x86_64
Epoch       : 7
Version     : 2.02.180
Release     : 10.el7_6.8
Size        : 3.0 M
Repo        : installed
From repo   : updates
Summary     : Userland logical volume management tools
URL         : http://sources.redhat.com/lvm2
License     : GPLv2
Description : LVM2 includes all of the support for handling read/write operations on
            : physical volumes (hard disks, RAID-Systems, magneto optical, etc.,
            : multiple devices (MD), see mdadm(8) or even loop devices, see
            : losetup(8)), creating volume groups (kind of virtual disks) from one
            : or more physical volumes and creating one or more logical volumes
            : (kind of logical partitions) in volume groups.
Links:
Moving a volume group to another system: http://tldp.org/HOWTO/LVM-HOWTO/recipemovevgtonewsys.html
Videos:
nicely done video! Thanks Urban Pinguin 🙂
liked this article?
- only together we can create a truly free world
- plz support dwaves to keep it up & running!
- (yes the info on the internet is (mostly) free but beer is still not free (still have to work on that))
- really really hate advertisement
- contribute: whenever a solution was found, blog about it for others to find!
- talk about, recommend & link to this blog and articles
- thanks to all who contribute!