update: safety first!
when it comes to important files: safety comes first
thus recommend to the user that wants to go pro the following backup system:
- have two complete backups at two different places:
- backupA: at the company, USB 3.0 (! THE MORE DATA IS BACKED UP THE MORE SPEED IS NEEDED (or restore might take DAYS!)) connected to the server, doing daily incremental backups
- backupB: being a fire-proof double-metal casing (EMP proof) vault at a different place (home?)
- change those backups every day if possible otherwise every week
- if ransomeware destroys backupA then in the worst case scenario, one day or one week of work is gone
- remember: whatever is physically connected to the server, can be encrypted by ransomeware
- have the backup strategy tested once a year
- where the backup is restored completely on a backup-server, to test if all data is there and how long the process takes (USB 2.0 is definitely a massive bottleneck)
Updates on the topic:
https://relax-and-recover.org/
https://dwaves.de/2019/06/30/linux-bash-rsync-how-to-backup-over-internet-script-v1/
backups of a life system under linux – many answers and almost a science of itself.
i guess you will have to try a handful of them out to see if they work for you and fit your needs.
this article unfortunately is a bit chaotic.
howtos should be separated from the overview – and to create a good overview with pros and cons of backup solutions is not easy – if you have not tested them all yourself.
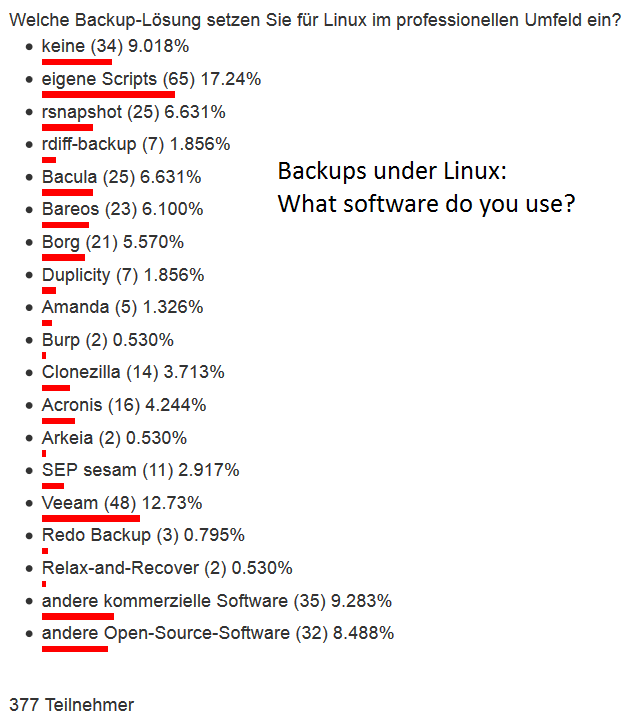
what are people using?
this is just a small survey with 377 participants – but it gives a nice “overview” of what people were using to backup their linux boxes.
Most people seem to assemble a file-wase backup concept in the “script it yourself” style. (so do i :-D)
10% do not do any backups.
Is it dumb to dump?
a live filesystem… Linux Torvalds thinks so…
actually it’s not dumb – depending on what you dump 😀
vss under linux
there needs a possibility to pause the filesystem in an (as consistent as possible) state – backup that state – while the server keeps running and writing, reading, changing files.
if you are running databases – consider using their backup-commands.
you could do a file-wise backup of MySQL but you would have to stop the database before that.
also restore might be complicated if not using the MySQL mysqldump/export command.
This can be done under linux with lvm-snapshots and some scripting 😉
But then how to do incremental backups then?
So it is about exporting/backingup data in consitent state while staying online – MySQL can do it.
xfs
can do incremental backups while staying online / live.
Only strange thing about it is – it does not backup into files – but into raw unformatted partitions 😀 (tape drive times are coming back).
dattobd (UNTESTED!) – solution to the Linux Snapshot Problem?
result of this howto sounds interesting: “From that point on, the system will automatically do an incremental backup of the root device every time you reboot or shut down.”
Linux has some basic tools for creating instant copy-on-write (COW) “snapshots” of filesystems. The most prominent of these are LVM and device mapper (on which LVM is built). Unfortunately, both have limitations that render them unsuitable for supporting live server snapshotting across disparate Linux environments. Both require an unused volume to be available on the machine to track COW data. Servers, and particularly production servers, may not be preconfigured with the required spare volume. In addition, these snapshotting systems only allow a read-only volume to be made read-write. Taking a live backup requires unmounting your data volume, setting up a snapshot of it, mounting the snapshot, and then using a tool like
dd
or
rsync -aAXv --update /* /path/to/backup/folder --exclude={/dev/*,/proc/*,/sys/*,/tmp/*,/run/*,/mnt/*,/media/*,/lost+found,/home/*/.gvfs
to copy the original volume to a safe location.
Many production servers simply cannot be brought down for the time it takes to do this and afterwards all of the new data in the COW volume must eventually be merged back in to the original volume (which requires even more downtime). This is impractical and extremely hacky, to say the least.
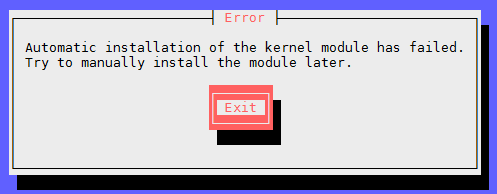
Datto Block Driver (Linux Kernel Module / Driver)
The Datto Block Driver (dattobd) solves the above problems and brings functionality similar to VSS on Windows to a broad range of Linux kernels. Dattobd is an open source Linux kernel module for point-in-time live snapshotting. Dattobd can be loaded onto a running Linux machine (without a reboot) and creates a COW file on the original volume representing any block device at the instant the snapshot is taken. After the first snapshot, the driver tracks incremental changes to the block device and therefore can be used to efficiently update existing backups by copying only the blocks that have changed. Dattobd is a true live-snapshotting system that will leave your root volume running and available, without requiring a reboot.
Dattobd is designed to run on any linux device from small test virtual machines to live production servers with minimal impact on I/O or CPU performance. Since the driver works at the block layer, it supports most common filesystems including ext 2,3 and 4 and xfs (although filesystems with their own block device management systems such as ZFS and BTRFS can not be supported). All COW data is tracked in a file on the source block device itself, eliminating the need to have a spare volume in order to snapshot.
Performing Incremental Backups
The primary intended use case of Dattobd is for backing up live Linux systems. The general flow is to take a snapshot, copy it and move the snapshot into ‘incremental’ mode. Later, we can move the incremental back to snapshot mode and efficiently update the first backup we took. We can then repeat this process to continually update our backed-up image. What follows is an example of using the driver for this purpose on a simple Ubuntu 12.04 installation with a single root volume on
/dev/sda1
. In this case, we are copying to another (larger) volume mounted at
/backups
. Other Linux distros should work similarly, with minor tweaks.
- Install the driver and related tools. Instructions for doing this are explained in INSTALL.md.
- Create a snapshot:dbdctl setup-snapshot /dev/sda1 /.datto 0
This will create a snapshot of the root volume at
/dev/datto0
with a backing COW file at
/.datto
. This file must exist on the volume that will be snapshotted.
- Copy the image off the block device:dd if=/dev/datto0 of=/backups/sda1-bkp bs=1M
dd
is a standard image copying tool in linux. Here it simply copies the contents of the
/dev/datto0
device to an image. Be careful when running this command as it can badly corrupt filesystems if used incorrectly. NEVER execute
dd
with the “of” parameter pointing to a volume that has important data on it. This can take a while to copy the entire volume. See the man page on
dd
for more details.
- Put the snapshot into incremental mode:dbdctl transition-to-incremental 0
This command requests the driver to move the snapshot (
/dev/datto0
) to incremental mode. From this point on, the driver will only track the addresses of blocks that have changed (without the data itself). This mode is less system intensive, but is important for later when we wish to update the
/backups/sda1-bkp
to reflect a later snapshot of the filesystem.
- Continue using your system. After the initial backup, the driver will probably be left in incremental mode the vast majority of time.
- Move the incremental back to snapshot mode:dbdctl transition-to-snapshot /.datto1 0
This command requires the name of a new COW file to begin tracking changes again (here we chose
/.datto1
). At this point the driver is finished with our
/.datto
file we created in step 2. The
/.datto
file now contains a list of the blocks that have changed since our initial snapshot. We will use this in the next step to update our backed up image. It is important to not use the same file name that we specified in step 2 for this command. Otherwise, we would overwrite our list of changed blocks.
- Copy the changes:update-img /dev/datto0 /.datto /backups/sda1-bkp
Here we can use the update-img tool included with the driver. It takes 3 parameters: a snapshot (
/dev/datto0
), the list of changed blocks (
/.datto
from step 1), and an original backup image (
/backups/sda1-bkp
created in step 3). It copies the blocks listed in the block list from the new snapshot to the existing image, effectively updating the image.
- Clean up the leftover file:rm /.datto
- Go back to step 4 and repeat: Keep in mind it is important to specify a different COW file path for each use. If you use the same file name you will overwrite the list of changed blocks. As a result you will have to use dd to perform a full copy again instead of using the faster
update-img
tool (which only copies the changed blocks).
If you wish to keep multiple versions of the image, we recommend that you copy your images a snapshotting filesystem (such as BTRFS or ZFS). You can then snapshot the images after updating them (step 3 for the full backup or 7 the differential). This will allow you to keep a history of revisions to the image.
src: https://github.com/datto/dattobd
There are actually a lot of backup programs – but which one is right for me? (in terms of features and complexity)
What i don’t understand – with MySQL you also get a mysqldump command – which can nicely be scripted to iterate ALL existing databases – and export/backup/dump them in a consistent state – to file.sql.gz – without stopping MySQL – without a fuzz.
So in this term – MySQL since a lot of years can do “snapshot”/backups/exports – it can even do incremental backups! Nice!
“Assuming a good portion of the data on your MySQL server remains unchanged over time, you can increase the speed and reduce the required storage space for your regular backups by backing up not all the data on the server each time, but only the changes to the data which have taken place over time.” (src)
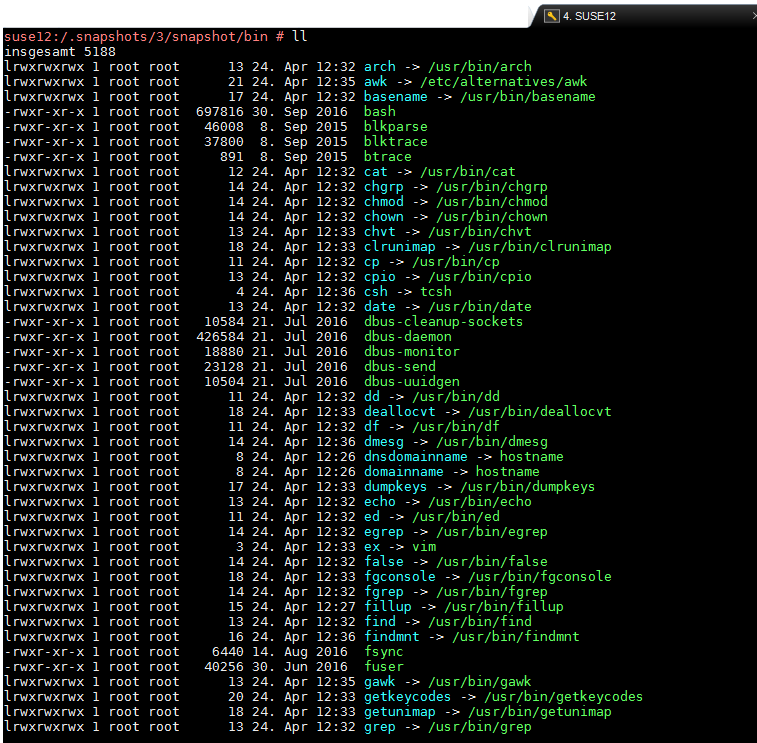
Maybe BTRFS snapshots are the way to go. (untested, SUSE12 is using it already)
It also seems to be a “copy only changed files – soft-link the rest” kind of approach. (with SUSE12 you get a /.snapshot folder – that does automatic snapshots – filled with a lot of softlinks :-D)
Acronis and ShadowProtect come with a nice management GUI.
Acronis uses a virtual harddisk controller that deeply installs into the system – that allows to backup (export to compressed file) the running (live, online) filesystem without powering down the system – it seems there is no free Open Source alternative available – yet. (Linus? :-D)
“By default, Acronis Backup & Recovery 10 uses Acronis VSS Provider which interacts with Microsoft VSS to create volume shadow copies of the data, however the actual VSS snapshot created by Microsoft VSS is not used (Acronis Backup & Recovery 10 uses its own snapshot).”
https://kb.acronis.com/content/4729
ShadowProtect uses the Windows-NTFS-build-in-VSS service.
if you know of one – i would be happy to be notified via the comment section (scroll way down) of this massively long article. (sorry)
backup solutions for linux: commercial is expensive – selfmade seems complicated
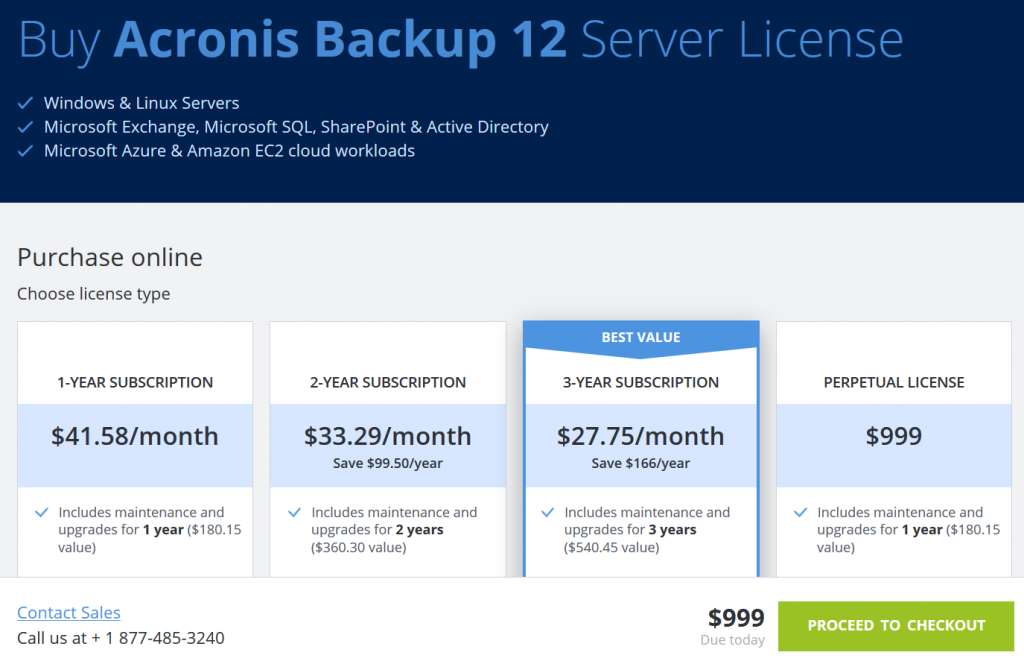
for Windows commercial backup software like Acronis True Image or ShadowProtect are sold – for as little as 1000USD – you can have the time-unlimited server version. Hurray!
MS Windows implemented this in WinXP – usable since Windows 7 as “Volume Shadow Copy” (VSS) and most backup software are probably using this service (Acronis True Image, Shadow Protect (pretty nice alternative – there should be competition 😉 in a free market – otherwise it is a monopoly-non-free-market 😀)
Microsoft TechNet Article: What Is Volume Shadow Copy Service?
Volume Shadow Copy Service[2] or VSS[2]) is a technology included in Microsoft Windows that allows taking manual or automatic backup copies or snapshots of computer files or volumes, even when they are in use.
so the question is:
is there a Linux VSS like alternative?
basically a way to backup your filesystems/partitions/harddisk (data but also installation with MBR) – maybe even in a – full or incremental way – whithout stopping the machine (for long :-D)
Acronis True Image can do backups of Linux installations – but probably does it in a dd | gz way 😀 – offline and sector-by-sector. (it generates a (linux based?) bootcd that allows you to do offline backup and restore – from a second harddisk, external USB-Disks or from network-shared-folder)
Two keywords are mentioned: LVM snapshots – and BTRFS (which SUSE12 is now using to make automatic backups of the installed OS).
advantage of linux for restoring to different hardware:
hardware independence – especially with the universal OS Debian (thanks guys! great work!) – try to boot a 1:1 copy of Windows that you transfer from server1->server2 – there are good chances you end up with a Bluescreen because of Windows HAL (Hardware Abstraction Layer).
With Linux chances are pretty good – it just works 😉 (that’s how it should be)
Even with OSX – you can just 1:1 copy/dump/dd an installation to a second harddisk – plug it to another machine – and chances are pretty good – it just boots up. (especially with Debian +non-free-drivers pre-installed 😀 (Mr Stallman will hate me for recommending this)
(you can try to do this from single user mode – or better – from knoppix boot cd or
so you don’t have to be tooooo paranoid to buy 10x server maindboards or hardware-raid-controllers of the same kind – that then keep accumulate dust in the server-room… just in case…
Download debian boot stick:
- completely with GUI (in german): ideal-linux-usb_stick_image_full_16GByte_2017-04.img.gz”
- without GUI: ideal-linux-usb_stick_image_minimal_2017-04.img.gz (Dateigröße: 646MByte)
I – personally – copied my working Debian8 installations between laptop and desktop and was pretty happy i did not have to do all the re-setup sh**** that you will have to do with Windows – because of HAL.
Even moving Windows VMs between virtualization technologies – IS A MAJOR PAIN IN THE **** because of the stubborn HAL
Windows: “What? Your mainboard is defect? I am used to this and that harddisk controller… f*** you – i won’t do any hardware re-detection – i won’t boot – spend some time with sysprep – reactivate – reinstall or whatever… ”
what i would wish for / would be cool to have on linux:
features:
- a solid filesystem 😀
- no sense if you get massive amounts of cool features – and then some funny day your files go corrupt.
- reliability – stability – solidity backup system
- no sense – if you restore from a backup file and realize – it is corrupted. (happened to me once with Acronis True Image 10, when i forgot to checkbox the “check backup after creation” box… which is NOT enabled per default *ARGH*)
- reilable automation (timed backups, daily, weekly, monthly)
- should be able to backup over network to shared folders (SMB, NFS) or even transfer backups via ssh over internet (coooool! 😉
- should be able to do full and incremental dumps/snapshots/backups of whole os-installations and mounted (online) partitions and filesystems
- This is where Acronis True image really shines – when restoring a partition… you can even RESIZE it (make it larger – but not smaller)
- should be able to do full and incremental backups “file-wise” of folders and files of mounted (online) partitions and filesystems – even (!!!) when the files are in use.
- should be able to regular check backup’s itegrity (md5sum, CRC, sha512sum)
- it would probably be wise to store some recovery data CRC next to the file or in the file – just in case a handful bits decide to flip/freak out and ruin your day. (like rar
 can do it – and it has proven pretty usefull for large up/downloads (could self-repair corrupt files))
- it would probably be wise to store some recovery data CRC next to the file or in the file – just in case a handful bits decide to flip/freak out and ruin your day. (like rar
- should be able to select and extract folders/files from backups and only restore these files
- should be able restore full os-installations and partitions/filesystems – maybe even from remote.
- Acronis True Image installs it’s own little boot-partition that you can choose to boot into during boot-loader screen… well you will have to have some VPN-tunnel access to your LAN and a proper server mainboard with IPMI (you can download SuperMicro Java based IP View Tool here)
- IPMI is a cool “output screen of server – even in BIOS” feature like Supermicro main boards IPMI (even web and java based (!!!)) remote console have 😀 (others have too see intel)
- about IPMI

- https://www.thomas-krenn.com/de/wiki/Supermicro_IPMIView
- it allows you to access BIOS from remote AND mount a CDIMAGE into a virtual drive to boot from… massively cool, if you need to manage servers during holiday (i hope not).
- this probably can not be done on a live-server (proof me wrong 🙂 – so it would be okay to have some downtime here… for the process of restoring.
- Acronis True Image installs it’s own little boot-partition that you can choose to boot into during boot-loader screen… well you will have to have some VPN-tunnel access to your LAN and a proper server mainboard with IPMI (you can download SuperMicro Java based IP View Tool here)
- ease of use / user friendlyness:
- software should have an understandable interface (be it in terminal or under gnome) or atleast it’s command set should be simple to understand
- a backup or restore command should not span 3 screens (too complex = prone to errors)
- of course this is always a trade-off – between complexity/feature-set and user-friendlyness… let’s put it like this… it should be learnable in one day.
- examples:
- ShadowProtect presents you directly with it’s complex but manageable GUI while Acronis tries to “look simple” by hiding a lot of options first – that you have to search for later.would be good if GUI / command-set stays “consistent” – meaning – not change every 3 months – so you will have to relearn “where is what”.
- Acronis loves to change it’s GUI with EVERY F**** VERSION.
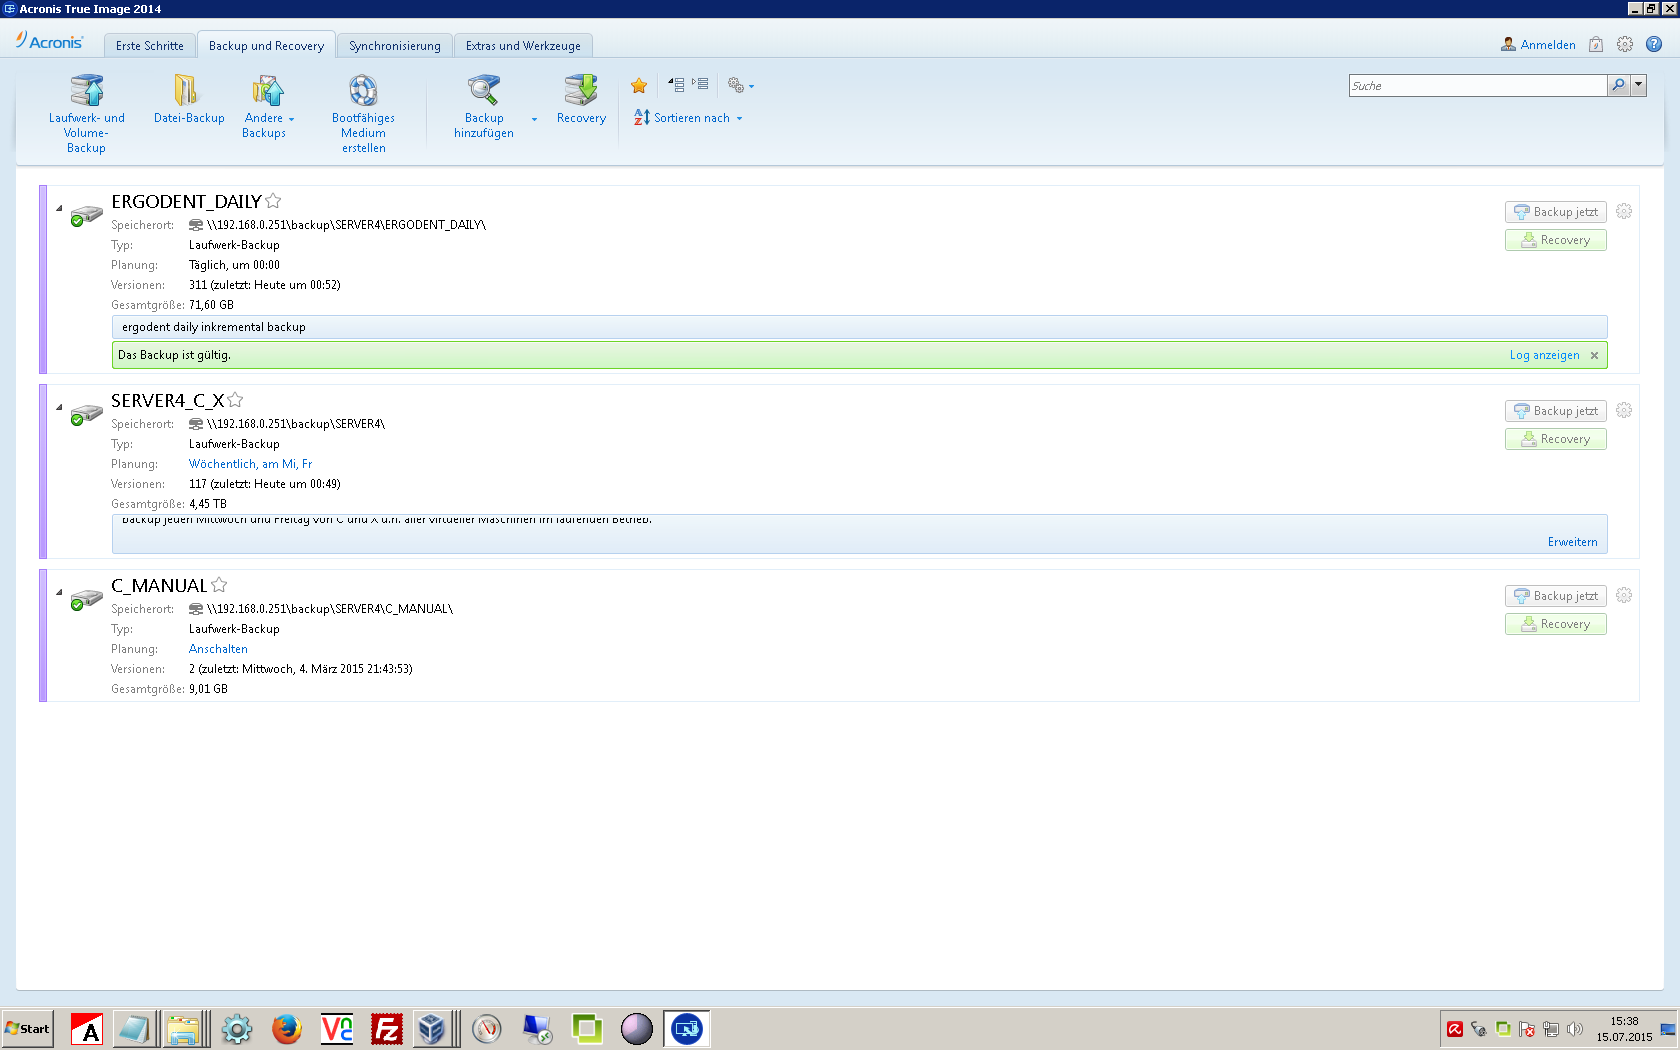
- Here you can see the GUI of Acronis Version 14 (probably has changed a lot since then) – which is nicely done – you get a nice overview of what is backuped when to where.
- as i write this – Version 2017 seems to be recent – don’t ask me about their version-numbering logic – it is purely marketing based i guess.

- examples:
- cool to have but no must: yes it would be cool if you can backup windows and linux and osx and your mobile phone… 😀 (anything missing here?)
is virtualization the solution?
it certainly makes backup and restore and update-testing (does update break functionality) way easier.
most virtualization products can do snapshots – but for this they usually have to halt the VM in some way (save state or shutdown) – until the process is done.
So you will have to find a time-window where to do that.
This does not hurt on most sundays – but some workaholics even decide to work from home on sundays.
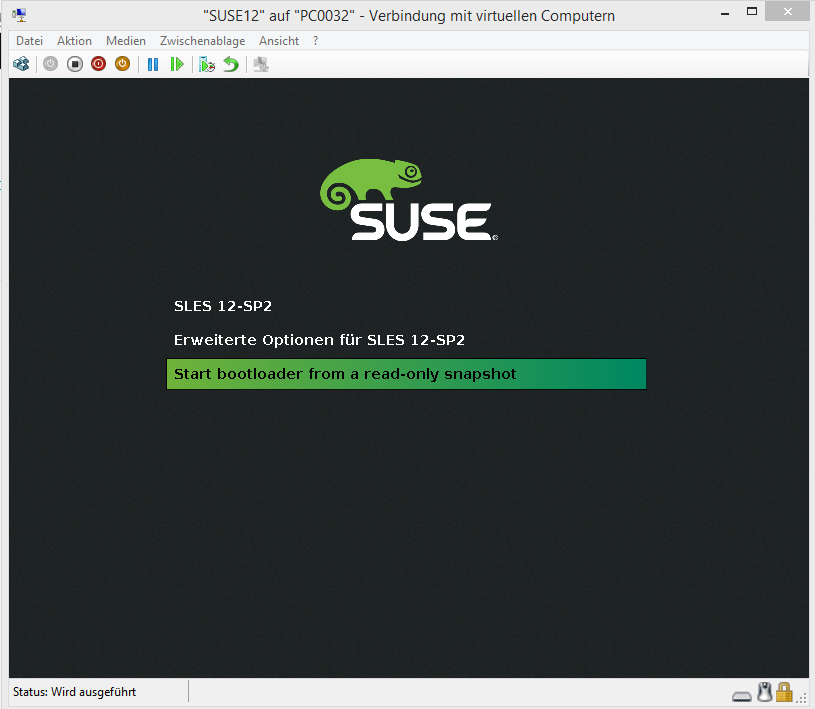
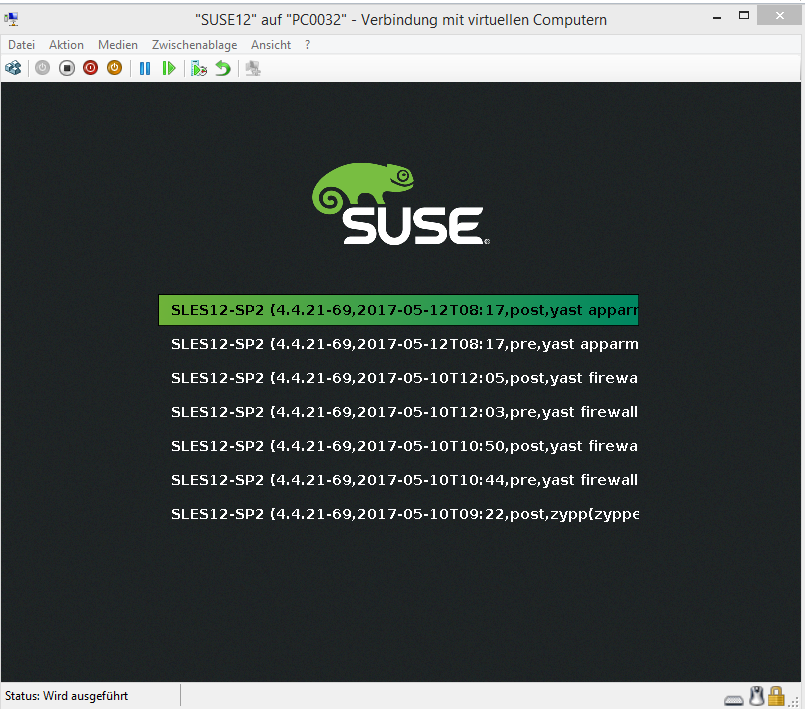
suse12 and bootable BTRFS snapshots
pretty cool… but probably just for disaster-recovery purposes (failed update) on a test-server… you would probably have to take that server offline – boot into read-only snapshot – backup – restore – boot read-write.
What backup methods/software is there for linux?
I guess most backup software for linux (except dd) is working file-wise.
Duplicity
- concept:
- file-wise backup
- features:
- incremental backups
- encrypted backups
Duplicity devises a scheme where the first archive is a complete (full) backup, and subsequent (incremental) backups only add differences from the latest full or incremental backup.[3]
Duplicity is a software suite that provides encrypted, digitally signed, versioned, remote backup of files requiring little of the remote server.[2]
https://en.wikipedia.org/wiki/Duplicity_(software)
Attic
A newcomer to the scene is Attic https://attic-backup.org/
We used rdiff-backup for a few years as our primary backup method. It was great for what it did, but created tens/hundreds of thousands of small diff files across the course of a year. Most file systems and disks are going to struggle to deal with a million-plus file count. Backing up our 90GB Maildir-based IMAP store would take a few hours. I had to constantly lower the number of weeks/diffs that we would keep for history.
In comparison, once we switched to Attic, nightly backups ran in only 15-20 minutes. That means it’s much more viable to keep a year’s worth of incremental backups to let you go back to any day within the past year.
Main features that drew me to Attic:
- It doesn’t create thousands of files on the destination server
- Deduplication using variable block sizes
- Has built-in compression
- Effective at backing up virtual machine image files
- Efficient over WAN connections
After using it for 6-9 months, I’m fairly confident that it’s as stable as rdiff-backup. I still do a multi-generation copy of the Attic directories using removable media, but each removable media has a full copy of the Attic repository.
has built-in support for snapshot backups on Linux using either LVM or dattobd.
An alternative to LVM snapshot is to use the datto block driver (aka. dattobd).
From the dattobd GitHub page:
The Datto Block Driver (dattobd) solves the above problems and brings functionality similar to VSS on Windows to a broad range of Linux kernels. Dattobd is an open source Linux kernel module for point-in-time live snapshotting. Dattobd can be loaded onto a running Linux machine (without a reboot) and creates a COW file on the original volume representing any block device at the instant the snapshot is taken. After the first snapshot, the driver tracks incremental changes to the block device and therefore can be used to efficiently update existing backups by copying only the blocks that have changed. Dattobd is a true live-snapshotting system that will leave your root volume running and available, without requiring a reboot.
I tried it and it works as expected on ext4 fs. There is also a working example (with scripts) given in the wiki.
rsync
rsync -aAXv --update /* /path/to/backup/folder --exclude={/dev/*,/proc/*,/sys/*,/tmp/*,/run/*,/mnt/*,/media/*,/lost+found,/home/*/.gvfs}
- concept:
- filewise backup synchronisation of folders of a mounted (online) filesystem over network to a remote ssh-accessible place
- compression: during transfer
tar
- concept:
- filewise backup of files and folders of a mounted (online) filesystem to a single file
- compression: gzip, bzip2 and others
is nice to do file-wise compressed backups
backup:
tar fcvz backup_file.tar.gz /folder/to/backup
tar fcvz backup_file.tgz /folder/to/backup
tar fcvj backup_file.tar.bz /folder/to/backup
bzip2 creates smaller compressed backup than tar fcvz (gzip))
restore:
tar fxvz backup_file.tar.gz
or
tar fxvj backup_file.tar.bz
https://dwaves.de/2015/08/21/linux-bash-basic-backup-project-including-database-backup-sh-script/
cpio
- concept:
- filewise backup of files and folders of a unmounted (offline) filesystem to a single file
- compression: ?
backup:
find ./test |cpio -ov > test_backup
restore:
cpio -i <test_backup
dump & restore
- concept:
- exists for certain filesystems like ext2 and xfs
- filewise backup of files and folders of a unmounted (offline) filesystem to a single file
- compression: ?
- backup of unmouned partitions and filesystems
- features:
- ease of use: ?
- capable of extracting selected files and folders from backup
- incremental backups: ?
The “dump” will archive all of your files together into a single file like tar, but it also gives you a very simple way to recover individual files more surgically than the other options do.
http://www.linuxscrew.com/2007/08/13/move-linux-to-another-hard-drive-dump-restore-backup/
see: https://www.lifewire.com/dump-linux-command-4095284
https://sourceforge.net/projects/dump/
dump – 4.4bsd dump and restore for ext2 filesystems
xfsdump – Administrative utilities for the XFS filesystem
examples:
backup:
dump -0 -f /dev/sda1 /
dd
- concept:
- backup of full unmounted (offline) partitions and filesystems to a single large file
- compression: can be piped to gzip
examples:
https://dwaves.de/2015/07/23/linux-dd-backup-and-restore-an-bootable-usb-stick/
arconis true image for 1000USD
managed to install the client-agent… but no gui. (wrong version? confusing)
“ahh okay so i can run the Management Console on a windows server or whatever and install just an agent on the Linux Server ?”
src: http://www.acronis.com/de-de/support/documentation/ABR11.5/index.html#5132.html
fuck it.
Acronis Backup  can  be  installed  in  the  following Linux
distributions:

    (a) Red Hat Enterprise Linux 4.x, 5.x, 6.x, 7.0, 7.1,
        7.2

    (b) Ubuntu 9.10, 10.04, 10.10, 11.04, 11.10, 12.04,
        12.10, 13.04, 13.10, 14.04, 14.10, 15.04, 15.10,
        16.04

    (c) Fedora 11, 12, 13, 14, 15, 16, 17, 18, 19, 20, 21,
        22, 23, 24

    (d) SUSE Linux Enterprise Server 10 and 11
        SUSE Linux Enterprise Server 12 – supported on file
        systems, except for Btrfs

    (e) Debian 4, 5, 6, 7.0, 7.2, 7.4, 7.5, 7.6, 7.7, 8.0,
        8.1, 8.2, 8.3, 8.4, 8.5

    (f) CentOS 5.x, 6.x, 7, 7.1

    (g) Oracle Linux 5.x, 6.x, 7.0, 7.1, 7.2 --  both
        Unbreakable Enterprise Kernel and Red Hat Compatible
        Kernel

    (h) CloudLinux 6.x

    (i) ClearOS 5.x, 6.x, 7, 7.1
src: Acronis_Linux_HOWTO.INSTALL.txt
you can download a trial
su; # become root
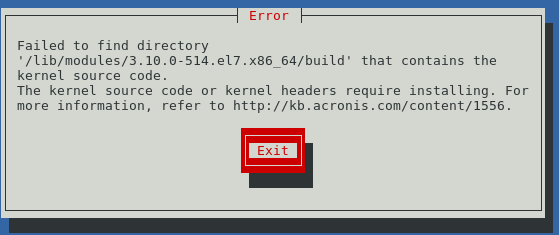
yum install kernel-devel # get kernel source
# kernel sources will be copied to
/usr/src/kernels/3.10.0-514.16.1.el7.x86_64/
# there is a broken softlink in

# /usr/src/kernels/3.10.0-514.el7.x86_64
# ->
# /usr/src/kernels/3.10.0-514.16.1.el7.x86_64/
# which you will have to fix like this
unlink /lib/modules/3.10.0-514.el7.x86_64/build; # remove old link
ln -sv /usr/src/kernels/3.10.0-514.16.1.el7.x86_64/ /lib/modules/3.10.0-514.el7.x86_64/build; # create new link to correct path
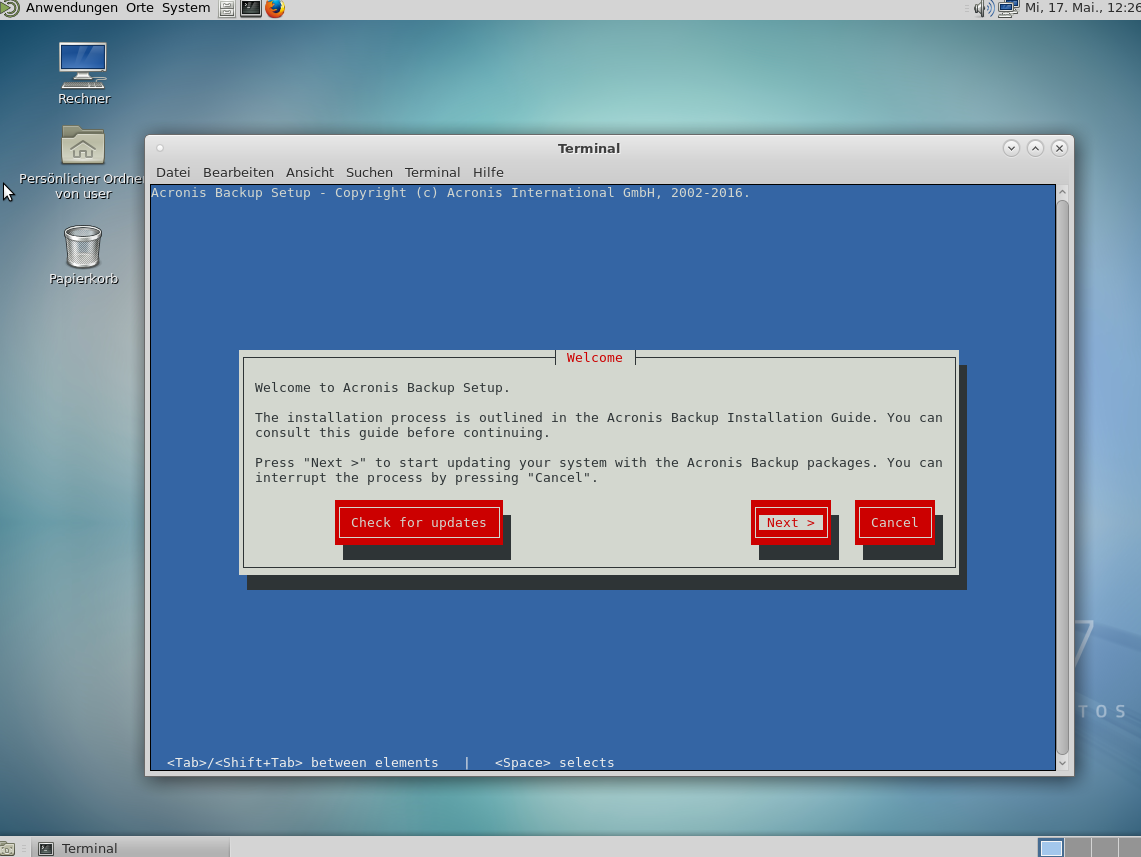
wget http://download.acronis.com/AcronisBackupAdvancedLinux64_11.7_trial_en-EU.tar; # download
tar fxv AcronisBackupAdvancedLinux64_11.7_trial_en-EU.tar; # unpack
# you will get binary files
AcronisBackupAdvancedAgentL64_11.7_50058_en-EU.x86_64
AcronisBackupAdvancedMConsoleL64_11.7_50058_en-EU.x86_64
AcronisBackupAdvancedMediaBuilderL64_11.7_50058_en-EU.x86_64
chmod u+x AcronisBackupAdvancedAgentL64_11.7_50058_en-EU.x86_64; # mark runnable
./AcronisBackupAdvancedAgentL64_11.7_50058_en-EU.x86_64; # run (does not need X11 gnome GUI, i just wanted to checkout if it comes with a grafical-GUI-client or not)
so where to go from here? what do you get?
the program did not even bother to integrate into the Gnome2 MATE Desktop menu 🙁
how the f**** i am supposed to start the GUI now? (i know there is one 😀 from the handbook)
it’s puzzle game…
new commands: without manpages
acrocmd
acronis_agent
acronis_mms
acronis_rsm
“To run the program under the X Window System interface, use the trueimage command”
tried that…this is what i got:
trueimagemnt
Error: You must specify either list, mount, umount or stop command.
Usage:
trueimagemnt [-h|–help] [-t|–fstype filesystem type] [-m|–mount mountpoint] [-f|–filename archive filename] [-i|–index index] [-w|–read-write] [-d|–description “archive description”] [-p|–password password] [-k|–keepdev] [-o|–loop] [-r|–read-only] [-c|–fsopts] [-U|–net-user] [-P|–net-password] [-l|–list] [-n|–print0] [-u|–umount mountpoint] [-s|–stop pid]
“or select Acronis True Image Echo Server from the system tools menu.” (there is NONE)”
To work in the console mode, use trueimagecmd and trueimagemnt tools, described in Chapter 11. See also man trueimagecmd or man trueimagemnt.
2.4 Removing the program
To remove Acronis True Image Server for Linux, do the following:
1. Issue the following commands:
# cd /usr/lib/Acronis/TrueImageServer/uninstall/
# ./uninstall
2. Remove the sources of the SnapAPI module:
# rm -rf /usr/src/snapapi*
… i don’t have time for this.
one more shot on Debian8.8
uname -a; # tested on/with
Linux debian 3.16.0-4-686-pae #1 SMP Debian 3.16.43-2 (2017-04-30) i686 GNU/Linux
apt-get install linux-headers-$(uname -r); # install kernel sources headers
apt-get install rpm gcc make; # will need that or error:
less /var/log/trueimage-setup.log; # if errors happen – check logs – rerun steps

YEAH 😀
Acronis_Linux_HOWTO.INSTALL.txt
ps uax|grep Acronis
root 689 0.5 12.5 255848 129672 ? Ssl 14:53 0:04 /usr/lib/Acronis/BackupAndRecovery/mms
root 690 0.0 0.4 17160 4776 ? Ssl 14:53 0:00 /usr/lib/Acronis/Agent/acronisagent
root 691 0.1 2.2 100356 23104 ? Ssl 14:53 0:01 /usr/lib/Acronis/ARSM/arsm
root 1656 6.5 12.6 253808 130632 pts/1 Sl+ 15:04 0:02 /usr/lib/Acronis/BackupAndRecovery/mms
root 1719 0.0 0.2 4560 2144 pts/0 S+ 15:05 0:00 grep Acronis
list of open ports: lsof.acronis.txt
Acronis True Image uses the following ports:
- TCP ports 443 and 80
- TCP ports 44445 and 55556 for login, activation and access to Acronis cloud
- TCP ports 58085 and 58081 for local mobile backup
- TCP and UDP ports 20 and 21 for backup to FTP
Acronis Backup (Advanced) uses the following ports:
- TCP port 9876 for installation (local and remote) and for communication between components
- TCP ports 445 and 25001 for remote installation
- TCP ports 443 and 902 to access the vCenter Server and ESX(i) hosts
- TCP ports 443, 44445, and 55556 for backup to cloud
Acronis Snap Deploy uses the following IP Addresses:
- IPv4 multicast address: 239.255.219.45
- IPv6 multicast address: FF05::fAA5:741E
Acronis PXE Server of Acronis Snap Deploy uses the following ports and IP address:
- UDP ports 67, 68, 69
- Broadcast address: 255.255.255.255
Acronis Backup & Recovery (including Acronis License Server) uses the following ports:
- TCP port 9876
- TCP port 25001 for remote installation
Components of Acronis True Image 9.1/Echo, Acronis Recovery for MS SQL Server, and Acronis Recovery for Microsoft Exchange use the following ports for remote operation:
- UDP port: 9876
- TCP port: 9876, if busy, choose at random
- Acronis Management Console UDP port: 9877, if busy, choose at random
For the full list of remote installation prerequisites refer to the user guide of the respective product.
ShadowProtect
supported OS:
- CentOS and Red Hat Enterprise Linux 7 and 6
- Ubuntu 16.04, 14.04, 12.04
- Oracle Linux (RedHat kernel only)
features:
- For Linux systems, a StorageCraft-built snapshot driver ensures you swiftly get a solid backup every time.
- For Windows systems, we leverage Microsoft Volume Shadow Copy Service (VSS) to ensure solid backups, and our proprietary snapshot driver StorageCraft® Volume Snapshot Manager™ (VSM) makes sure those backups happen fast.
howto install: https://www.storagecraft.com/de/downloads/spx-linux-installieren
trial available: https://www.storagecraft.com/downloads/trials/spx-linux
https://www.storagecraft.com/products/shadowprotect-spx/tech-info
SETUP DOES NOT WORK FOR DEBIAN!
wget https://downloads.storagecraft.com/spx/Ubuntu16.04/storagecraft-repo-latest.deb -O storagecraft-repo-latest.deb
sudo dpkg -i storagecraft-repo-latest.deb
sudo apt-get update
Note: The above command installs a copy of the StorageCraft repository public signing key to the files system and also automatically adds it to the apt keystore of your Ubuntu machine. You can find a copy of this key at http://downloads.storagecraft.com/spx/Ubuntu16.04/stc/repository.key
2. To install all (the UI and agent):
sudo apt-get install spx kmod-stcvsm-$(uname -r)
Reading package lists… Done
Building dependency tree
Reading state information… Done
E: Unable to locate package spx-gui
To install agent only:
sudo apt-get install spx-agent
To install UI only:
Reading package lists… Done
Building dependency tree
Reading state information… Done
E: Unable to locate package spx-agent
sudo apt-get install spx-gui
3. To verify that the latest version of SPX installed, run:
dpkg-query –show spx
4. Add the current user to the SPX management group:
sudo /usr/bin/gpasswd -a $USER spx
5. The service starts automatically after install. To manually start the service:
systemctl start spx
6. To open the console:
- Use Search to locate the SPX icon
- To open the interface from the terminal, the terminal command is:/opt/StorageCraft/spx/bin/spx_gui
The StorageCraft repo deb package only needs to be installed once. After that, install subsequent builds by using:
apt-get update
apt-get install spx
CloneZilla
is nice if you want to do full disk-image save and restore via network-boot (!!!).
You will have to setup a server (can be a virtual machine) that does that for you.
it’s not super complicated to setup… but you have to be carefull… it comes with it’s own DHCP (must) – so you should NOT run it in your LAN.
https://dwaves.de/2014/10/14/clonezilla-server-for-deployment-of-windows-images/
https://dwaves.de/2014/12/09/clonezilla-options/
bareOS
pretty new 🙂 fork from (complicated) Bacula in 2010 – first release 2013. It is probably designed for backups of thousands and thousands of computers… not what you might need in an household.
While bareOS itself is free and i show you here how you can get it installed (if its not complicated – it’s not from Germany :-D) – support is not free – https://www.bareos.com/de/Preise.html starting at 290€ per year.
Of course those software developers also live in the money-matrix and can’t provide everything for free…
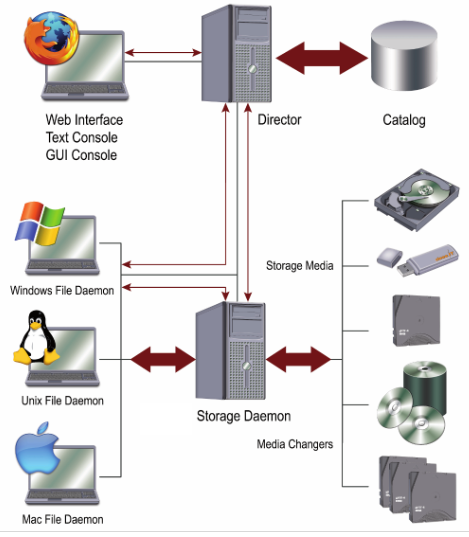
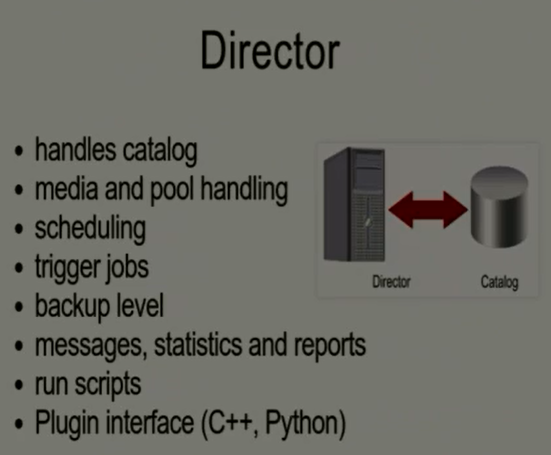
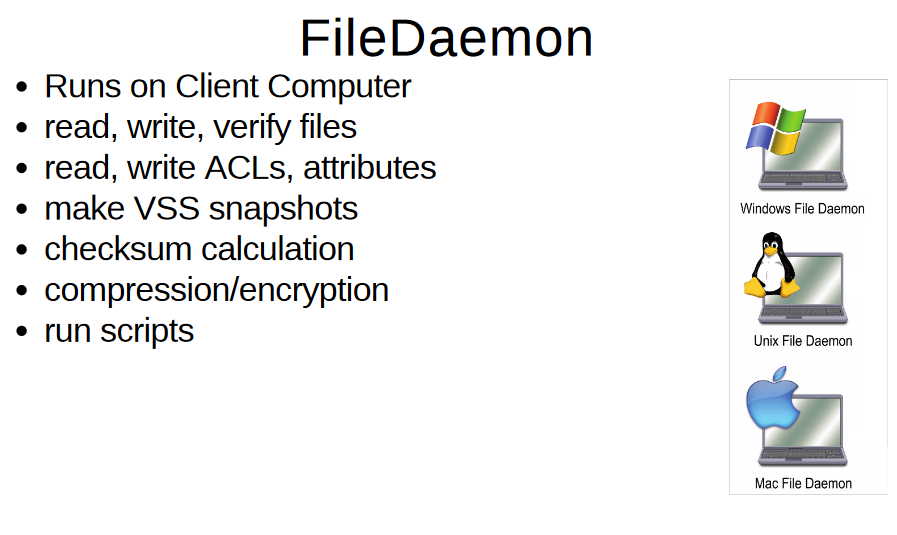
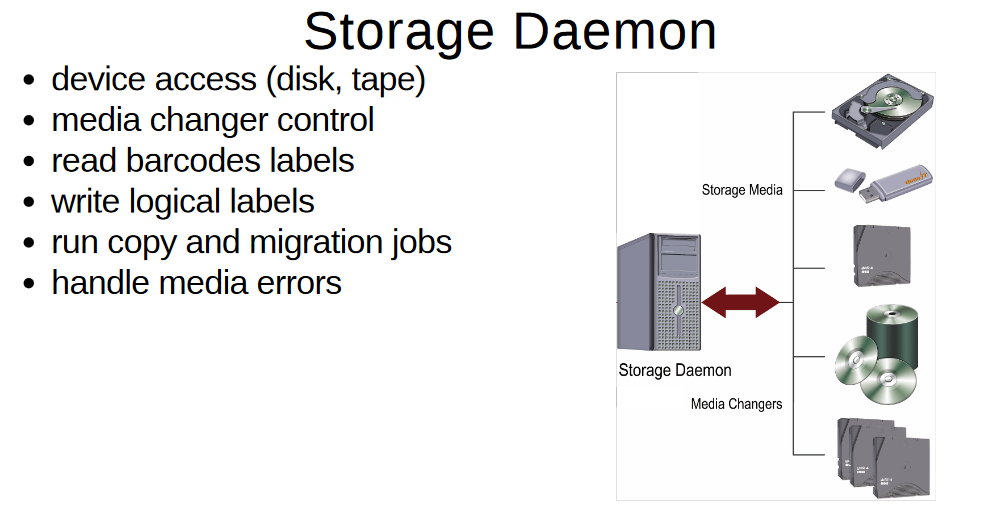
bareOS architecture concept structure
features:
- available for all operation systems you can THINK of (at least client-software): Gentoo, Ubuntu, Arch Linux, FreeBSD, CentOS, Debian, Fedora, openSUSE, RHEL, SLES, Ubuntu, Univention COrporate Server, Windows, OSX (Client), UNIX: AIX, HP-UX, Solaris
- concept:
- client software is installed on all clients
- backup methods: full, differential, incremental
- backup management, volume management
- retention periods
- flexible scheduling
- encryption on the client
- secure erase
concepts:
- web-based gui (PHP)
Links:
- Bareos Project
- Presentation Video recording (mp4)
- Video recording (WebM/VP8)
- Submit feedback
- https://fosdem.org/2017/schedule/event/backup_dr_bareos_overview/
- https://www.bareos.org/share/bareos-project-feed.xml
- http://www.debianadmin.com/how-to-install-bareos-fork-of-bacula-backup-application-in-debian-7-0.html
- http://www.admin-magazin.de/Das-Heft/2015/06/Workshop-Aufbau-und-Inbetriebnahme-von-Bareos
- http://download.bareos.org/bareos/release/latest/
setup: (not soooooo easy)
http://doc.bareos.org/master/html/bareos-manual-main-reference.html#InstallChapter
uname -a; # tested on Debian 8.8
Linux debian 3.16.0-4-686-pae #1 SMP Debian 3.16.43-2 (2017-04-30) i686 GNU/Linux
you will also need some way to copy config files between server and client (usually ssh 😀 for linux servers and clients)
# checkout what is the latest version for your distro:
http://download.bareos.org/bareos/release/latest/
vim /scripts/bareos_install.sh; # make install script and fill with
#!/bin/bash
# === start of script
# you might need to modify the red lines
DIST=Debian_8.0
# or
# DIST=Debian_6.0
# DIST=xUbuntu_14.04
# DIST=xUbuntu_12.04
# DATABASE=postgresql
# or
DATABASE=mysql
URL=http://download.bareos.org/bareos/release/latest/$DIST/
# add the Bareos repository
printf “deb $URL /\n” > /etc/apt/sources.list.d/bareos.list
# add package key
wget -q $URL/Release.key -O- | apt-key add –
# install Bareos packages
apt-get update;
apt-get -y install mysql-server; # install mysql
apt-get -y install mysql-client; # install mysql
apt-get -y install bareos bareos-database-$DATABASE; # install bareos
apt-get -y install bareos-webui; # install web-interface
apt-get -y install iceweasel; # web-gui is worthless without a browser 🙂
# === end of script
ESC :wq # save and quit vim
chmod u+x /scripts/bareos_install.sh; # mark it runnable
# set mysql-root password, for test environments it is okay to say “root”


# root password – you can use root for testing


mysql -u root -p; # test mysql access works
show databases; # just for fun
+--------------------+
| Database           |
+--------------------+
| information_schema |
| bareos             |
| mysql              |
| performance_schema |
+--------------------+
4 rows in set (0.00 sec)
exit; # quit mysql
service bareos-fd status; # check status of file-daemon (should be up and running)
service bareos-sd status; # check status of storage-daemon (should be up and running)
service bareos-sd start; # start storage-daemon
service bareos-dir status; # check status of director-daemon (should be up and running)
service bareos-dir start; # start director-daemon
apt-get install bareos-bat; # install GUI
# now you should be able to interact with the system and run some programs
### TERMINAL:
bconsole; # bareos command line version
Connecting to Director localhost:9101
1000 OK: bareos-dir Version: 16.2.4 (01 July 2016)
Enter a period to cancel a command.
*help
Command Description
======= ===========
add Add media to a pool
autodisplay Autodisplay console messages
automount Automount after label
cancel Cancel a job
configure Configure director resources
create Create DB Pool from resource
delete Delete volume, pool or job
disable Disable a job/client/schedule
enable Enable a job/client/schedule
estimate Performs FileSet estimate, listing gives full listing
exit Terminate Bconsole session
export Export volumes from normal slots to import/export slots
gui Switch between interactive (gui off) and non-interactive (gui on) mode
help Print help on specific command
import Import volumes from import/export slots to normal slots
label Label a tape
list List objects from catalog
llist Full or long list like list command
messages Display pending messages
memory Print current memory usage
mount Mount storage
move Move slots in an autochanger
prune Prune records from catalog
purge Purge records from catalog
quit Terminate Bconsole session
query Query catalog
restore Restore files
relabel Relabel a tape
release Release storage
reload Reload conf file
rerun Rerun a job
resolve Resolve a hostname
run Run a job
status Report status
setbandwidth Sets bandwidth
setdebug Sets debug level
setip Sets new client address — if authorized
show Show resource records
sqlquery Use SQL to query catalog
time Print current time
trace Turn on/off trace to file
unmount Unmount storage
umount Umount – for old-time Unix guys, see unmount
update Update volume, pool, job or stats
use Use specific catalog
var Does variable expansion
version Print Director version
wait Wait until no jobs are running
When at a prompt, entering a period cancels the command.
You have messages. (really? from who?) 😀
### GUI:
# assumed you have some X11 desktop installed
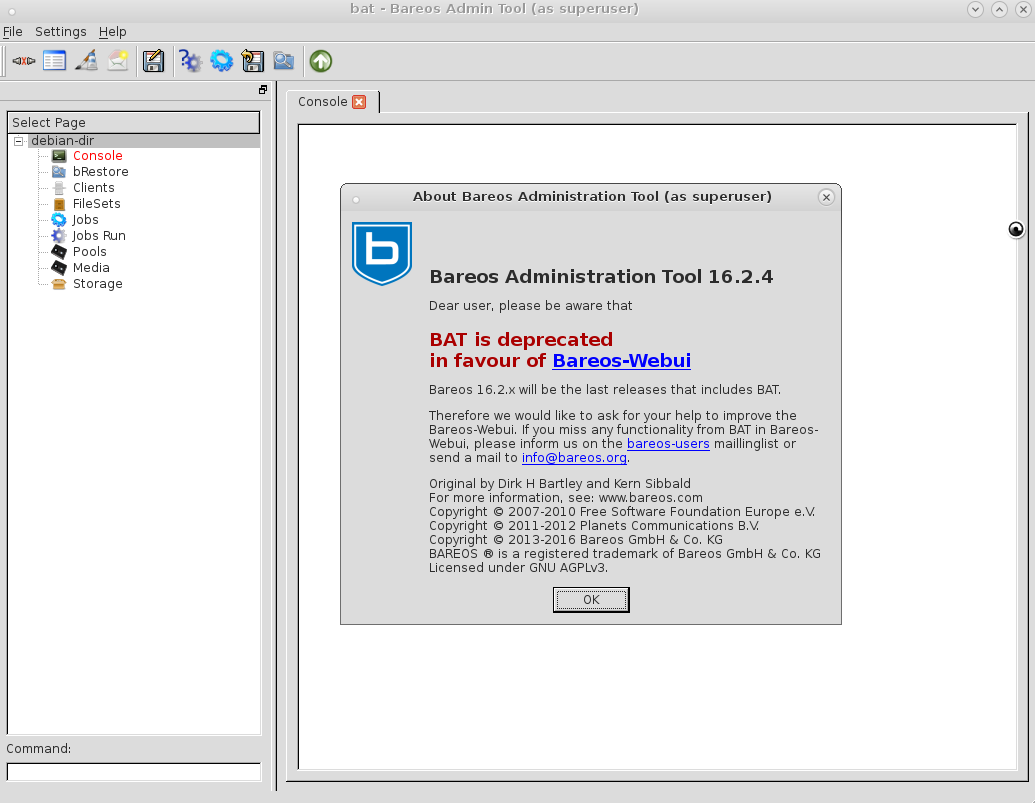
bat; # start GUI, e.g. on gnome2 + lightdm + MATE it looks like … right in your face… it is deprecated go web html GUI!
### WEB
# theoretically you should be able to point your browser to:
# but no
# bareos-webui seems not to work out of the box
cd /var/www/html/
mv index.html ../; # move index.html out of the way
# checkout what is the latest release
https://github.com/bareos/bareos-webui/releases
tar fxvz *.tar.gz
mv bareos-webui-Release* bareos-webui; # rename folder
ps uax|grep apache2; # because apache2 is running under user www-data
www-data 7902 0.0 0.5 93824 5440 ? S 09:23 0:00 /usr/sbin/apache2 -k start
chown -R www-data:www-data /var/www/html/; # one should change permissions of /var/www/html
service apache2 restart; # restart apache
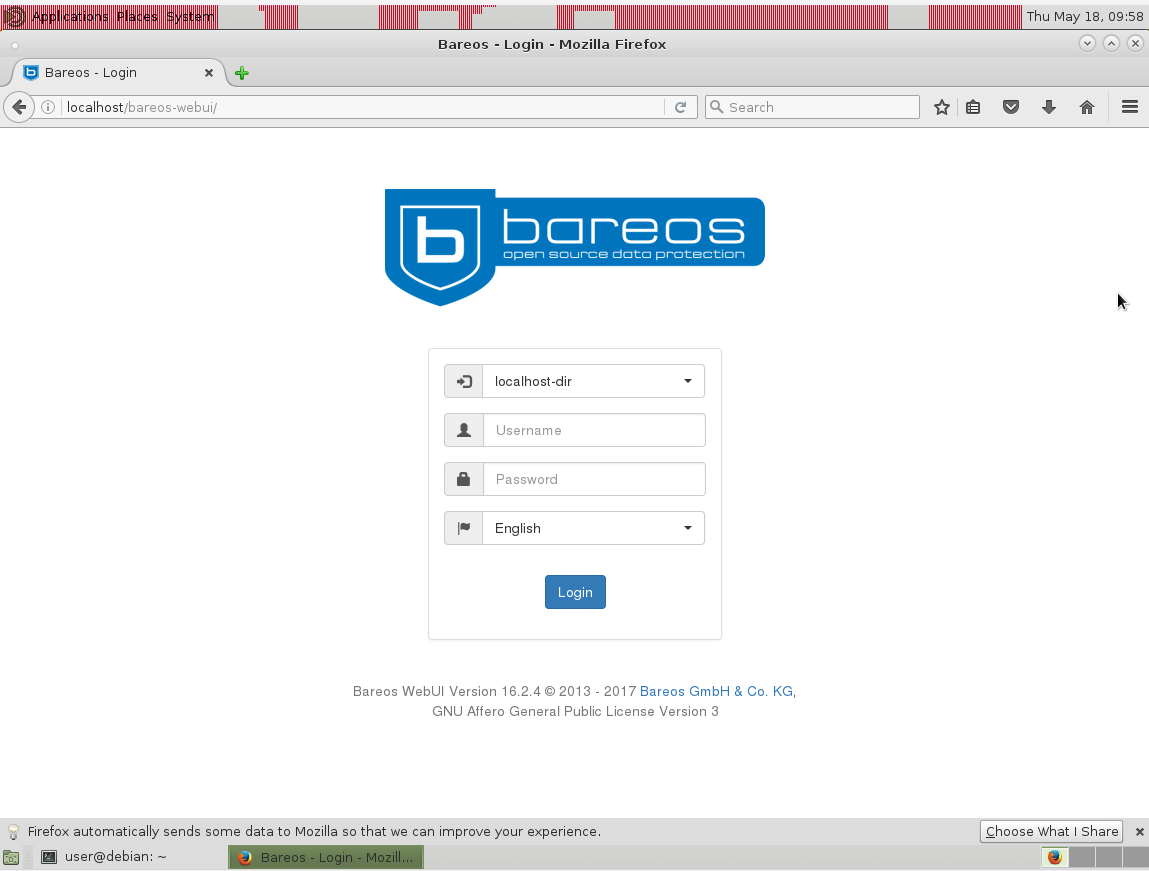
http://localhost/bareos-webui; # try again 😉
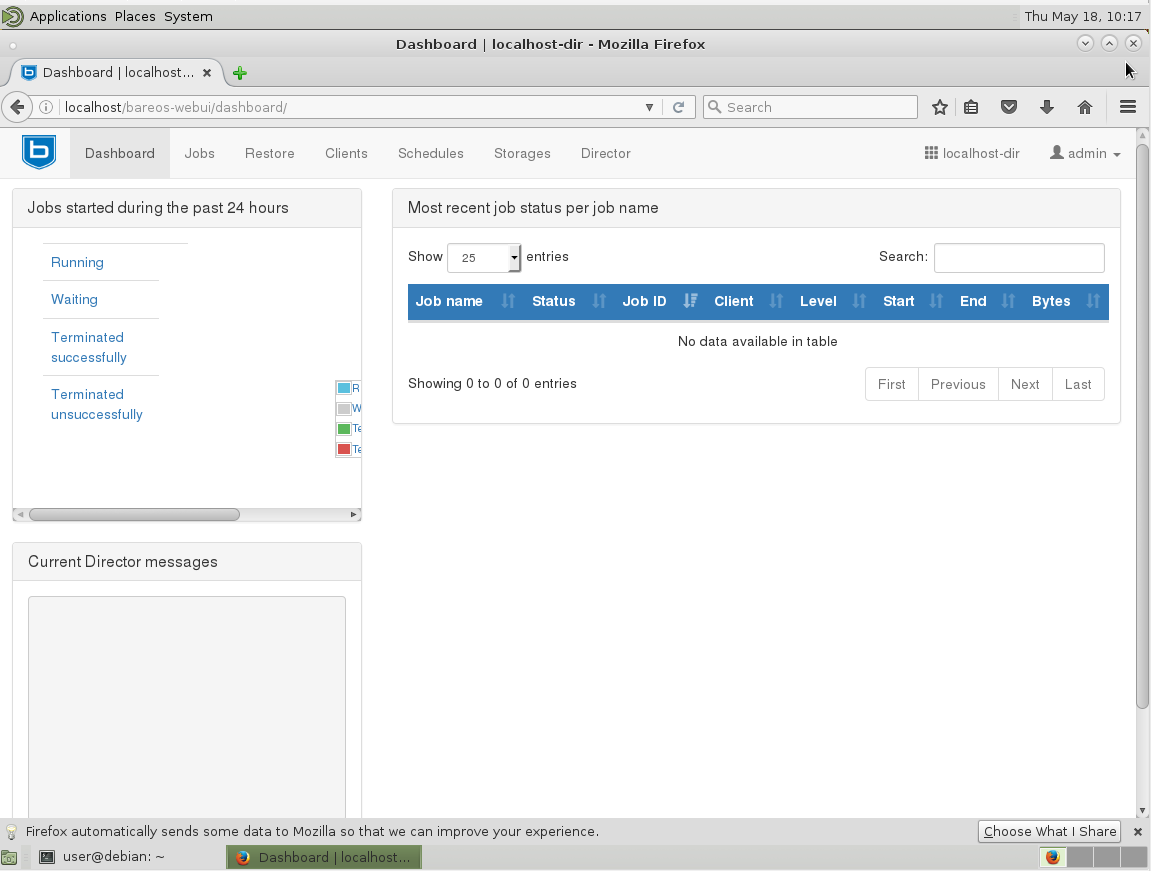
hurray! 🙂
Hurray! I managed to get bareos-webui working with Apache2. Those strange red artifacts at the top screen are exlusevly brought to you by Hyper-V.
# but there seems to be no default user created *ARGH!*
### setup web-gui-user-accounts
cp /etc/bareos/bareos-dir.d/console/admin.conf.example /etc/bareos/bareos-dir.d/console/admin.conf
chown -R bareos:bareos ./etc/bareos/bareos-dir.d/console
vim /etc/bareos/bareos-dir.d/console/admin.conf
#
# Restricted console used by bareos-webui
#
Console {
Name = admin
Password = “admin”
Profile = “webui-admin”
}
service bareos-dir restart; # restart bareos directory service
http://localhost/bareos-webui; # try again 😉
username: admin
password: admin
### where to go from here? or: how do i schedule a backup?
# now that we have a server – let’s install bareos-fd(file-deamon)-client-software on client
http://download.bareos.org/bareos/release/latest/
-> depending on OS this procedure might be different
# Debian-Client
again: checkout what is latest -> modify those commands
# add the Bareos repository
printf “deb $URL /\n” > /etc/apt/sources.list.d/bareos.list
# add package key
wget -q $URL/Release.key -O- | apt-key add –
apt-get update;
apt-get install bareos-client;
# my client is CentOS7 (RedHat)
wget -O /etc/yum.repos.d/bareos.repo http://download.bareos.org/bareos/release/latest/CentOS_7/bareos.repo
# After this, you should be able to install the bareos-filedaemon :
yum install bareos-fd
# This is the daemon responsible for communicating with the bareos-director on the bareos (backup) server. We need to enable the service to start at boot :
systemctl enable bareos-fd
# on server:
configure add client name=centos7 address=172.20.0.28 password=admin
# copy config to client (you will need ssh to be setup on client and server for this to work)
# if you may login as root via ssh you can do
scp /etc/bareos/bareos-dir-export/client/centos7/bareos-fd.d/director/bareos-dir.conf root@172.20.0.28:/etc/bareos/bareos-fd.d/director/
# usually for security reasons only non-root users can login
scp /etc/bareos/bareos-dir-export/client/centos7/bareos-fd.d/director/bareos-dir.conf user@172.20.0.28:/home/user/
# so you have to switch over to the client (login) and move the config file manually to its destination place
mv /home/user/bareos-dir.conf /etc/bareos/bareos-fd.d/director/
Links:
https://www.svennd.be/adding-a-linux-client-to-bareos/
https://www.bareos.org/en/HOWTO/articles/set_up_backup_client.html
config files:

diff /etc/bareos-webui/directors.ini /var/www/html/bareos-webui/install/directors.ini; # no difference either
vim /etc/bareos-webui/directors.ini; # here you can configure the port of the bareos-di (directory-service)
; Default value is 9101
dirport = 9101
lsof -i -P -n|grep 9101; # yep it is
bareos-di 5137 bareos 4u IPv4 21912 0t0 TCP *:9101 (LISTEN)
cp /var/www/html/bareos-webui/install/apache/bareos-webui.conf /etc/apache2/conf-enabled/
# /var/www/html/bareos-webui/install/apache/bareos-webui.conf # there it is
# /var/www/html/bareos-webui/install/nginx/bareos-webui.conf # also nginx support
# /etc/apache2/conf-available/bareos-webui.conf # already in place
# /etc/apache2/conf-enabled/bareos-webui.conf # already in place
diff /var/www/html/bareos-webui/install/apache/bareos-webui.conf /etc/apache2/conf-enabled/bareos-webui.conf; # there seems to be no difference between those files
vim /etc/apache2/conf-enabled/bareos-webui.conf
### if things go wrong check the logs
# dmesg said:
[ 347.289033] bareos-dbcheck[4099]: segfault at 0 ip b76c778c sp bfe0a7a0 error 6 in libbareos-14.2.1.so[b7695000+67000]
[ 1485.543021] bat[11312]: segfault at 0 ip b76c9d74 sp bfed2a00 error 6 in libbareos-14.2.1.so[b7698000+67000]
links:
http://www.admin-magazin.de/Das-Heft/2013/05/Neue-Features-im-Bacula-Fork-Bareos
http://doc.bareos.org/master/html/bareos-manual-main-reference.html
https://github.com/bareos/bareos-webui/blob/master/doc/README-INSTALLATION.md
http://linuxpitstop.com/install-bareos-backup-solution-on-centos-7/
rsync
rsync -aAXv --update /* /path/to/backup/folder --exclude={/dev/*,/proc/*,/sys/*,/tmp/*,/run/*,/mnt/*,/media/*,/lost+found,/home/*/.gvfs}
Actually rsync is doing a pretty good job – you can do reliable file-wise backups via rsync over ssh (public+private key automatic auth) over internet.
You will have to script the incremental/versioning/revisioning stuff yourself.
like crontab-daily or weekly run something like:
tar fcvz $(date +%Y-%m-%d-%M)_backup.tar.gz /path/to/filewise/backup/of/project
on your backup server.
of course because of the lack of incremental – this consumes a lot of space.
so you also need to consider – when to automatically delete old backups.
interesting -> https://github.com/systemd/casync
casync — Content Addressable Data Synchronizer
WORK IN PROGRESS
What is this?
- A combination of the rsync algorithm and content-addressable storage
- An efficient way to store and retrieve multiple related versions of large file systems or directory trees
- An efficient way to deliver and update OS and container images over the Internet
- An efficient backup system
bacula
highly complex backup solution for probably larger companies.
In terms of revisions/versioning/snapshots – this can be done with only copying files that changed since last snapshot – anything else will be hardlinks/softlinks – that do not consume any space.
https://www.linux.com/learn/how-create-and-manage-btrfs-snapshots-and-rollbacks-linux-part-2
More (untested!) software:
other backup software:
- SEP sesam
- Langmeier Backup
- ShadowProtect
- Bacula
- Duplicati
- Syncback Pro
- Veeam (A must-have free VM backup for vSphere and Hyper-V)
- NTBackup (Windows only)
- Paragon (Windows only)
all closed source except Bacula…
i found in the Debian software repository:
apt-cache-search-for-backup.txt
some interesting excerpts:
backintime – simple backup/snapshot system (common files)
Back In Time is a framework for rsync and cron for the purpose of taking snapshots and backups of specified folders. It minimizes disk space use by taking a snapshot only if the directory has been changed, and hard links for unmodified files if it has. The user can schedule regular backups using cron.
This is the common framework for Back In Time. For a graphical interface, install backintime-qt4.
To back up to SSH or encrypted filesystems, install the additional sshfs or encfs packages.
About Partclone
Partclone is a program similar to the well-known backup utility “Partition Image” a.k.a partimage. Partclone provides utilities to save and restore used blocks on a partition and is designed for higher compatibility of the file system by using existing libraries, e.g. e2fslibs is used to read and write the ext2 partition.
Partclone now supports ext2, ext3, ext4, hfs+, reiserfs, reiser4, btrfs, vmfs3, vmfs5, xfs, jfs, ufs, ntfs, fat(12/16/32), exfat, f2fs, nilfs. The available programs are:
partclone.btrfs
partclone.ext2, partclone.ext3, partclone.ext4
partclone.fat32, partclone.fat12, partclone.fat16
partclone.ntfs
partclone.exfat
partclone.hfsp
partclone.jfs
partclone.reiserfs
partclone.reiser4
partclone.ufs (with SU+J)
partclone.vmfs (v3 and v5)
partclone.xfs
partclone.f2fs
partclone.nilfs2
Our Team Information
Project admins: Thomas_Tsai
Co-developer: Jazz Yao-Tsung Wang, Steven Shiau, Ceasar Sun
Operating system: GNU/Linux
License: GNU General Public License (GPL)
Other related projects developed by us: Diskless Remote Boot in Linux (a.k.a DRBL), Clonezilla, Tuxboot, DRBL-winroll, Tux2live, Cloudboot.
modular backup utility
vbackup constists of a set of scripts that handle the various aspects of a backup. It can be easily extended to support other backup methods too. It can be used for full or incremental backups. It also includes a wizard for basic (quick) configuration.
Currently it supports/backups:
 * XFS using xfsdump
 * Generic filesystem backups using tar
 * PostgreSQL
 * MySQL
 * dpkg and RPM database
 * Partition tables, disk MBRs, MD and LVM information
 * OpenLDAP database
It can work with local files, handle NFS mounts or scp backups to a remote location. It also supports encryption using x509 certificates.
backup system for small systems and networks
These are the backup scripts used by chiark.greenend.org.uk and other systems belonging to the Sinister Greenend Organisation. Features:
 * Suitable for single systems and small networks.
 * Reasonably simple; they do what you tell it to.
 * Hard failures when individual systems fail, to encourage fixing !
If you have a larger site you may wish to look at Amanda.
https://packages.debian.org/en/sid/chiark-backup
Backup and Recovery Manager for PostgreSQL
Barman (Backup and Recovery Manager) is an open-source administration tool for disaster recovery of PostgreSQL servers written in Python.
It allows your organisation to perform remote backups of multiple servers in business critical environments to reduce risk and help DBAs during the recovery phase.
Barman is distributed under GNU GPL 3 and maintained by 2ndQuadrant.
https://packages.debian.org/en/sid/barman
Is dump really deprecated?
- What’s the story?
- What is the problem when dumping live filesystems?
- Is the problem peculiar to Linux?
- Can I use dump, then?
- Why not prefer one of the other utilities, if dump has these problems?
- Should I always verify the backups?
- Will dump be more reliable in the future?
What’s the story?
Back in April and May 2001, a Linux 2.4 kernel bug was being discussed in the Linux Kernel Mailing List. The bug caused incoherent view of a disk device when it was mounted read-write and you looked at it through its device file (such as /dev/hda1), even if you had synced the disks. There was no disagreement that this bug existed (or that it should be fixed, as it were); there was disagreement on its consequences. Linus Torvalds asked, why would anyone open the device file of a live filesystem? One of the answers was, to dump it. Linus responded with the following:
I think all these arguments are fairly bogus. Doing things like “dump” on a live filesystem is stupid and dangerous (in my opinion it is stupid and dangerous to use “dump” at _all_, but that’s a whole ‘nother discussion in itself), and there really are no valid uses for opening a block device that is already mounted.
Here’s Linus’s message, and here’s a related followup.
Naturally these statements by Linus caused concern among system administrators who were using dump. Later RedHat added to the worries by deprecating dump in the Red Hat Linux 9 Red Hat Linux System Administration Primer (section 8.4.2.3):
[M]any system administrators with UNIX experience may feel that dump and restore are viable candidates for a good backup program under Red Hat Linux. Unfortunately, the design of the Linux kernel has moved ahead of dump’s design.
The manual then quotes one of Linus’s messages and concludes that the use of dump is discouraged.
However, the dump developers and many dump users believe otherwise.
What is the problem when dumping live filesystems?
The problem is that the filesystem may be changing while you are dumping it. You have this problem with all backup utilities, but with dump it is more serious. When you are using tar, for example, a file could be changed at the time it is read by tar; in that case, that particular file would be corrupted in the resulting tar file. But whereas for tar this is a problem only if it so happens that the file is changed the instant it is read, dump could backup corrupted versions of files if they changed some time before dump attempts to read them. Let’s see why.
The kernel caches write operations to the disk. You can see this for yourself if you make some experiments with a floppy. Insert a floppy in the drive, mount it, and copy a file to the floppy; the operation, especially with recent 2.4 kernels, will appear to finish instantly. You can then do something like ls /mnt/floppy and see that your file is on the disk. But your file is not really on the disk; the drive’s light hasn’t been on at all. If you looked at the disk through /dev/fd0, you wouldn’t find your file there.
You can force the file to be actually written to the diskette by unmounting the diskette, or with the sync command; if you don’t, the kernel will write the file on the disk when it sees it fit to do so. What’s more, the kernel might actually write half the file on the disk, and I guess that this will be usual with hard disks; when there are lots of pending write operations at approximately the same physical area of the disk, the kernel will probably choose to flush them, but it will probably choose not to flush other pending operations at distant areas, so as to minimize head movement. Thus, when dump reads the filesystem through the block device, it will get corrupted versions of some files if there are pending write operations; even worse, the metadata (filesystem structure) could be corrupt, in which case (a part of) the filesystem could become entirely unreadable.
Is that problem peculiar to Linux?
No. RedHat is in error when they claim that the design of the Linux kernel has moved ahead of dump’s design. Dump always had this problem, on all operating systems and filesystems, by the very nature of its design. Linus’s arguments are correct, but they are true for any operating system, not just Linux. Linus only said that with 2.4 the problem is worse than with 2.2; he did not imply that with 2.4 the problem is worse than it has ever been in any operating system.
Actually in the first versions of the 2.4 kernel, the problem was worse, but this, as already mentioned, was a bug.
Can I use dump, then?
Dump is a really popular backup solution among Unix system administrators worldwide, and it is not because those administrators are ignorant of the problems.
First, you can safely use dump on unmounted and read-only filesystems. You can also safely use dump on idle filesystems if you sync before dumping (but can you be sure they are idle? a solution is to remount them read-only before dumping).
You can also use dump on non-idle filesystems, but with caution. You must take care to dump when the filesystem is not heavily loaded; for example, I dump during the night, when only logfiles and mailboxes are modified, and not heavily. If your filesystem is always on heavy load, maybe you shouldn’t use dump. In addition, you should verify your backups; see below.
Why not prefer one of the other utilities, if dump has these problems?
The fact that dump reads the block device directly gives it several advantages. First, you can dump unmounted file systems. It has been reported that this is particularly useful in cases of filesystem error which renders it unmountable; in those cases, it is useful to dump the filesystem (to the extent possible) before attempting to fsck it, in case fsck causes further data loss.
Second, dump never changes the filesystem while dumping it. The problem with tar and cpio is that they change a normally mounted read-write filesystem while reading it. The filesystem keeps three times for each file: the last modification time (mtime), the last access time (atime), and the last i-node modification time (ctime). When you read a file through a normal system call, its atime is set to the time of the access. You could then issue another system call to revert atime to its original value, as GNU tar does when given the –atime-preserve option, but in that case ctime changes to indicate an i-node modification. There is no system call to change ctime.
If you choose to leave the atime modified, you loose valuable information. I use atime to determine if my users have lots of unused files occupying unnecessary disk space; I can tell a user off for occupying 3 GB of disk space 2 GB of which they have neither read or written for the last three years. In addition, when I’m lost in configuration files, such as XF86Config and XF86Config-4, I can tell from the atime which one is actually being used. If you choose to restore atime and change ctime instead, you’ll have other problems. Backup utilities normally consider files with changed ctime to be changed, and thus save them in incremental backups. In addition, security monitoring tools may signal possible changes in system and configuration files.
In Linux, the “noatime” mount option causes the kernel to not alter atimes, so you can remount the filesystem with that option before tarring or cpioing and remount it again normally after backup. With this workaround you can use other backup utilities without altering the filesystem.
Dump’s third advantage is that it works faster, because it bypasses the kernel’s filesystem interface. I don’t have any experience on this, but I suspect that now that the machines are faster and the filesystem caches are much larger, this advantage is less important than what it used to be.
The above three advantages, namely the ability to backup unmounted filesystems, the fact that dump never changes the filesystem no matter how it is mounted, and speed, are rooted in the fact that dump reads the filesystem through the block device rather than through the normal filesystem calls. In addition, dump has some more advantages, namely ease of use and reliability. It’s much easier to get dump’s options correct than GNU tar’s. And, of course, dump’s complement utility, restore, does interactive restores whose user-friendliness and efficiency is unmatched. It is also frequently reported that dump can handle flawlessly all kinds of strange things, such as files with holes, files with unbelievably long filenames, files with unbelievably strange symbols in the filenames, and so on, and this reliability is probably due to the fact that it has been used so much. However, GNU tar is lately also reported to be exceptionally reliable.
A drawback of dump is that it must know some filesystem internals. As a result, you can’t find dump for all filesystems. There is currently no dump for ReiserFS. However, many administrators only choose among filesystems supported by dump (currently ext2 and ext3), because they won’t consider using another backup utility.
Should I always verify the backups?
Suppose you have set the system to backup the files at two o’clock each morning. Suppose, further, that among the tens of thousands of files unknown to you, there’s a file, /home/yourboss/unbelievably_important_file, that happens to always change while you are backing it up. Maybe your boss has set a cron job doing something tricky at two o’clock in the morning.
Let’s see another example. Among the files you backup at two o’clock each morning, there is a relational database which is live 24 hours a day. You obviously don’t want to backup its datafiles directly, because they would be in an inconsistent state. For this reason, you perform a database export and, instead, backup the export file together with the rest of the filesystem. You know the exporting takes about two minutes, so it’s really safe if you do it a whole hour before dumping/tarring. But instead of “0 1 * * * dbexport”, your finger slipped and typed “0 2 * * * dbexport”, and your eye failed to register the error (I always have to look up crontab syntax). Exporting takes place at two o’clock each morning. You have no backup of your database.
Or, maybe you typed the crontab alright, but your assistant changed it. Or maybe your crontabs are perfect, but for some strange reason, there’s always a transaction happening at one o’clock in the morning, and it stays open until two, and it causes the exporting to pause for exactly an hour.
These things may be far-fetched, but you have seen stranger things than those happening, haven’t you? And even if you somehow take care that none of the above happens, you can’t guard against a hundred other things which I can’t think of and you can’t think of, but will happen.
As these scenarios work perfectly whether you use dump or one of the other utilities, you must always verify the backups. Not only verify them; you must also test them. You must keep a recovery plan, and must regularly follow it to bring up a copy of your system from scratch. This, unfortunately, does not always work. You’ll certainly know you can bring up your database, but you probably won’t know you failed to bring up /home/yourboss/unbelievably_important_file, because you won’t know it exists until your boss comes and asks for it after a real data loss.
If you use “restore -C” to verify the backups, you may want to remount the filesystem with the “noatime” option, otherwise “restore -C” will change the atimes of your files.
All this shows that there are issues with backup that are much more important than dump’s problems. Backup is one of the trickiest parts of system administration, and although Linus is technically correct when he points out dump’s problems, he fails to see that these problems are but a small part of the big mess the administrator has to sort out in the real world.
Will dump be more reliable in the future?
In the future, dump’s problems will be solved by snapshots. Snapshots are a way to atomically get a read only copy of a filesystem which will be freezed at the time the snapshot was made, while leaving the original still mounted in read/write mode. A pseudo-code example:
    mount -o rw /dev/hda1 /mnt
    ... now you can start using /mnt for whatever you need ...

    # time to make a backup
    snap -create /dev/hda1 /dev/snap1 # create a snapshot of /dev/hda1
    dump 0f /dev/nst0 /dev/snap1      # backup the snapshot instead of the real +fs
    snap -delete /dev/snap1
Today some solutions exist for creating snapshots for filesystems which are part of a LVM or a EVMS installation, but for most filesystems you can’t have snapshots as the Linux kernel doesn’t support them yet.
written by Antonios Christofides, September 2003.
Questions, suggestions, and comments should go to the dump-users mailing list. Despite appearances, I’m not a dump expert; I just wrote up. But if you really want to email me, my address is anthony@itia.ntua.gr.
Copyright (C) 2003 Antonios Christofides
Permission is granted to reproduce and modify this document, provided that this notice remains intact and that no name is removed from the list of copyright holders (add your name if you make substantial changes).
(It is recommended, but not required, that you send modifications to the author/maintainer instead of creating a modified version yourself.)
src: http://dump.sourceforge.net/
Links:
https://debian-handbook.info/browse/stable/sect.backup.html
liked this article?
- only together we can create a truly free world
- plz support dwaves to keep it up & running!
- (yes the info on the internet is (mostly) free but beer is still not free (still have to work on that))
- really really hate advertisement
- contribute: whenever a solution was found, blog about it for others to find!
- talk about, recommend & link to this blog and articles
- thanks to all who contribute!